Calendar Booking Plugin - Admin Tutorial
Overview
The Calendar Booking Plugin is a powerful tool that allows administrators to manage appointment bookings for clients. This plugin enables you to configure time slots, manage holidays, customize the calendar's appearance, handle appointments, send automated emails, sync with external calendars, and control booking availability.
Table of Contents
- Accessing the Calendar Booking Plugin
- Dashboard Overview
- Managing Time Slots
- Setting Up Holidays
- Customizing Calendar Design
- Managing Appointments
- Viewing and Downloading Leads
- Email Notifications
- Booking Availability Settings
- Calendar Synchronization
- Best Practices
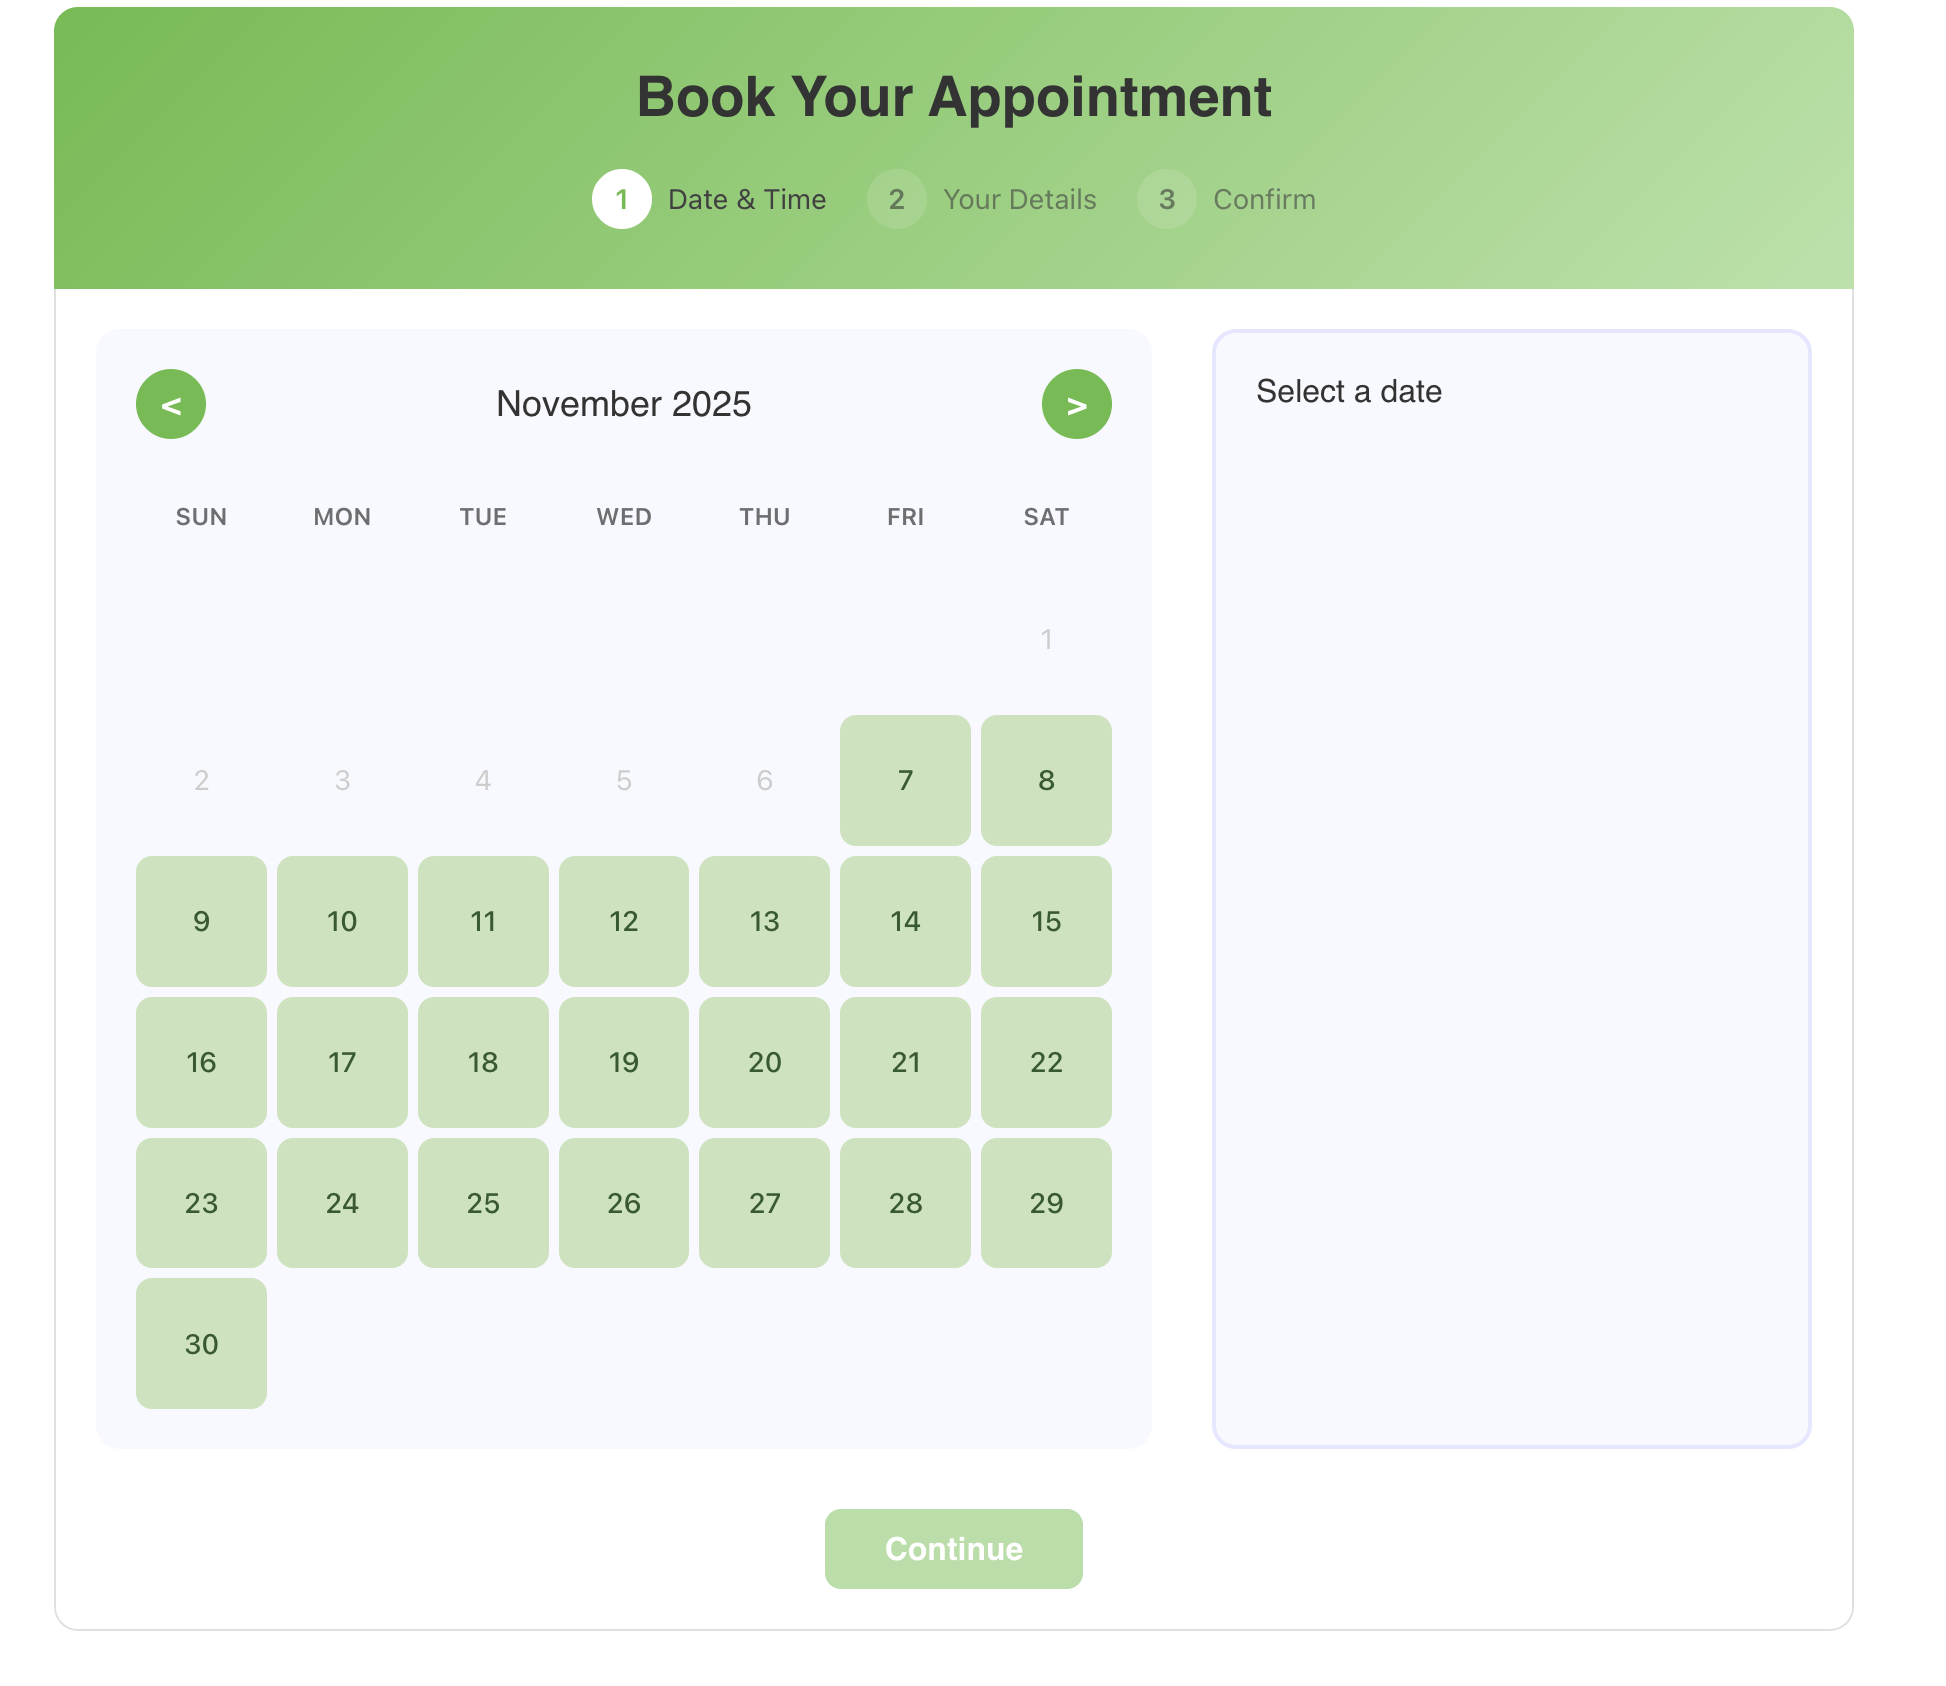
Accessing the Calendar Booking Plugin
Step 1: Login to WordPress
- Navigate to https://dkaconsult.com/login
- Enter your credentials
- Click "Log In"
Step 2: Open Calendar Booking Plugin
- In the WordPress admin dashboard (https://dkaconsult.com/wp-admin)
- Look for "Calendar Booking" in the left sidebar menu
- Click to expand and access various settings
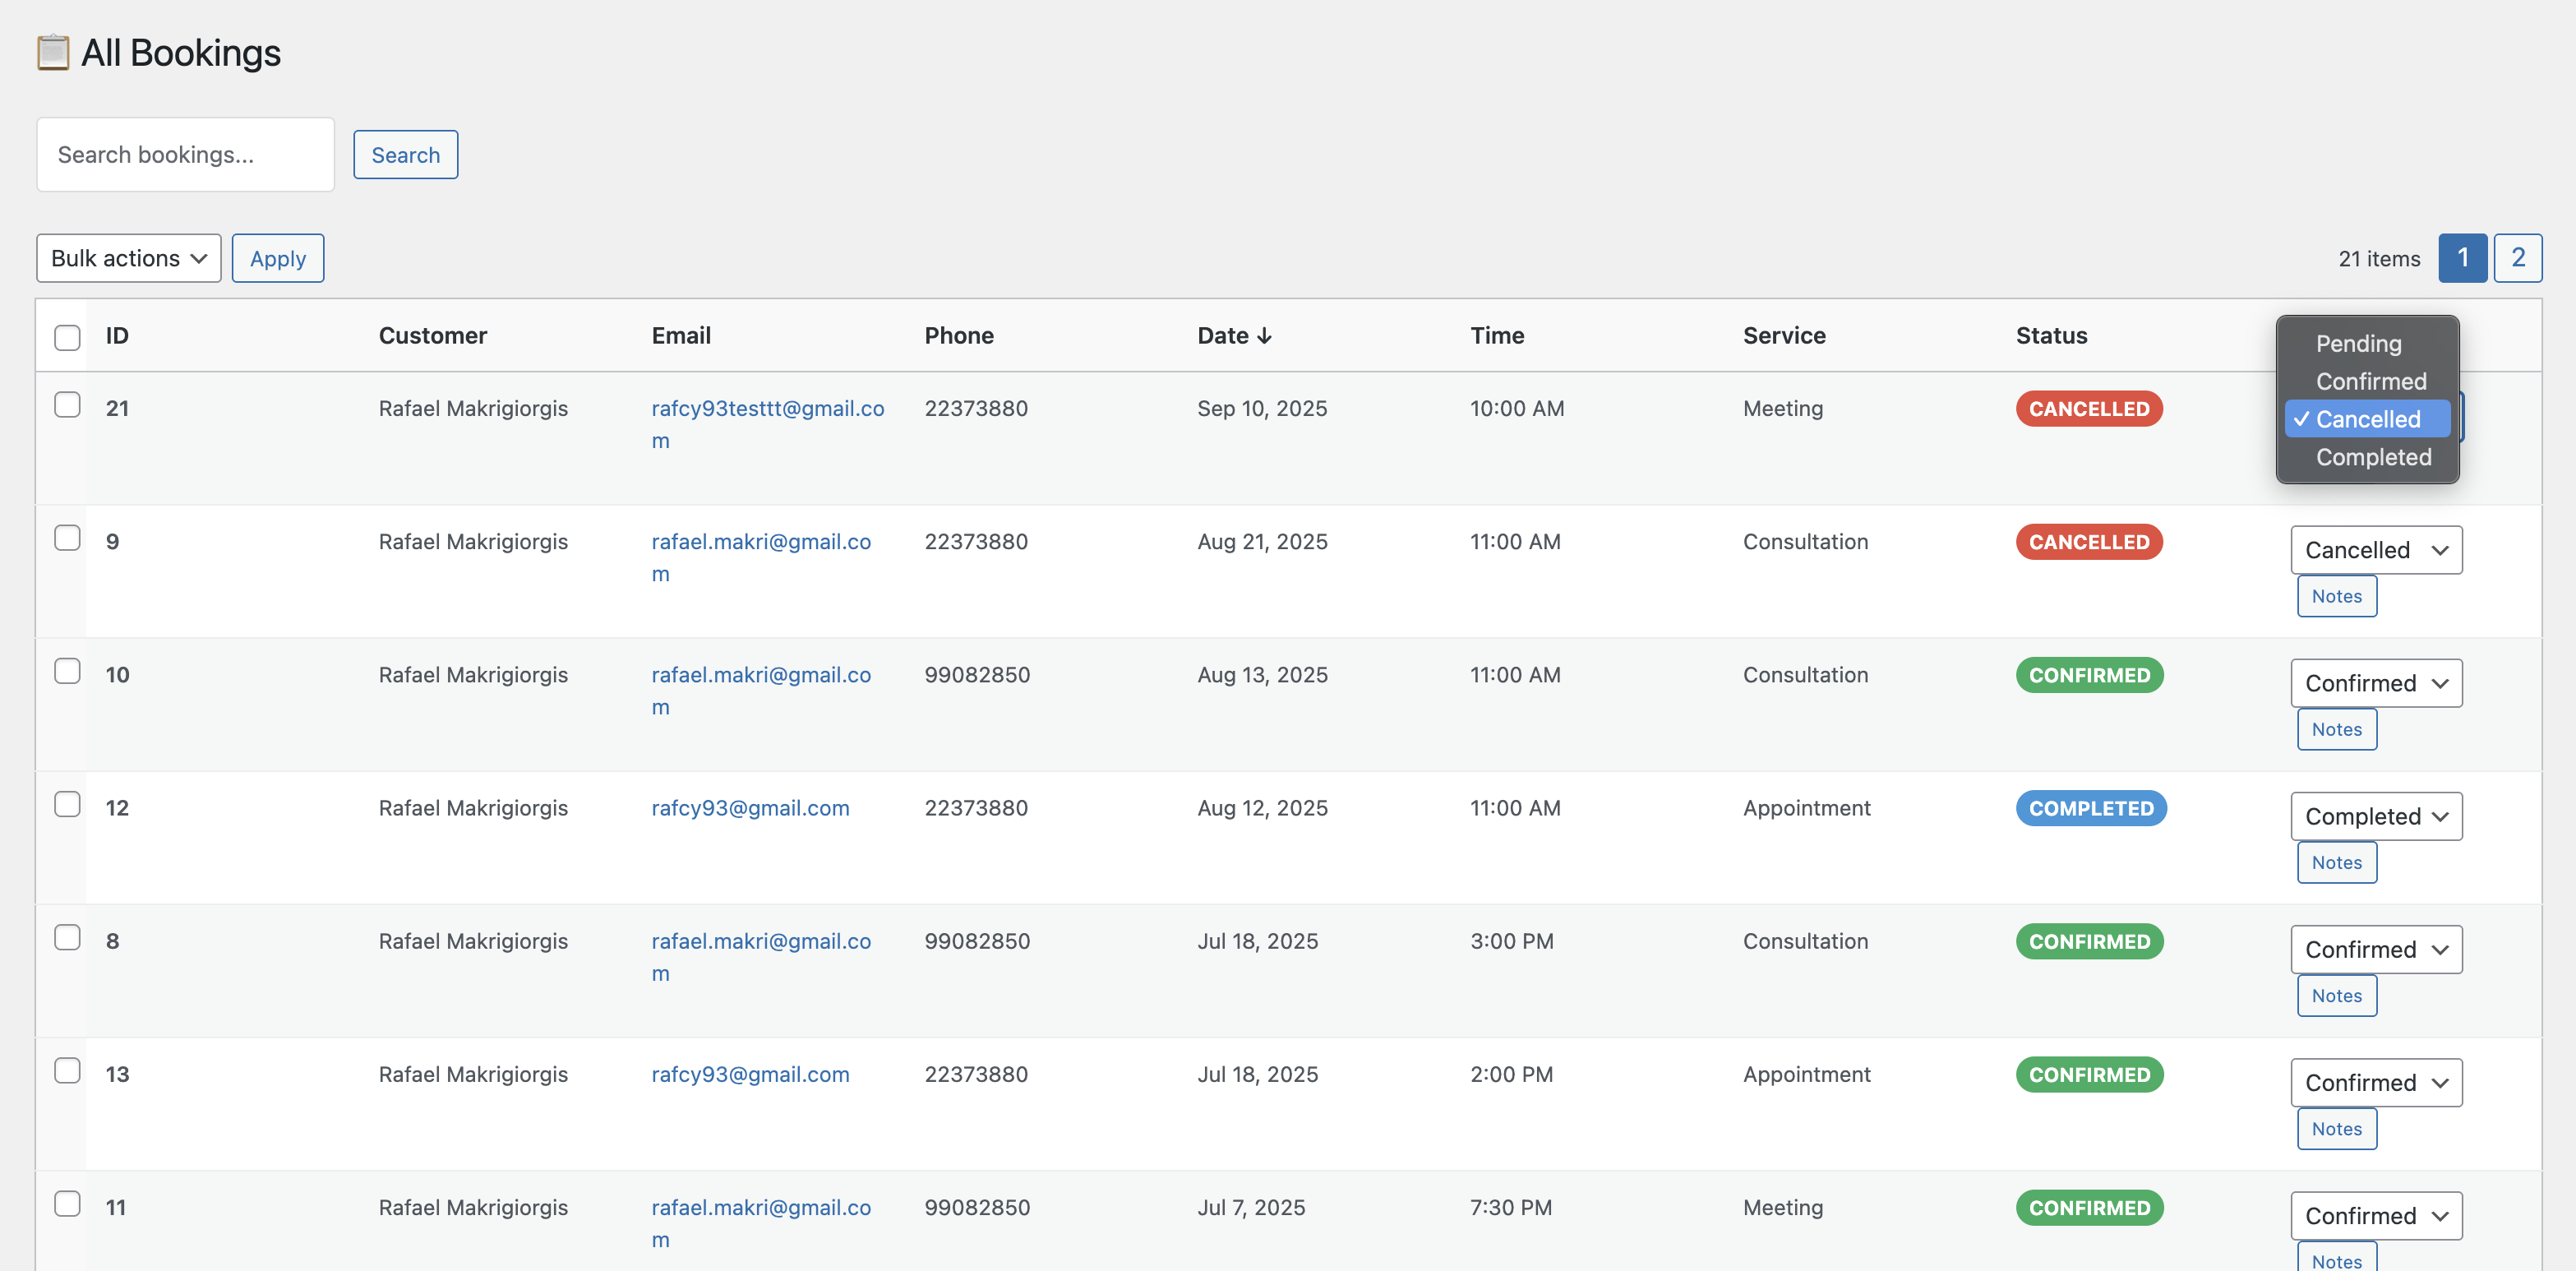
Dashboard Overview
The Calendar Booking plugin provides a comprehensive dashboard where you can manage all aspects of your booking system.
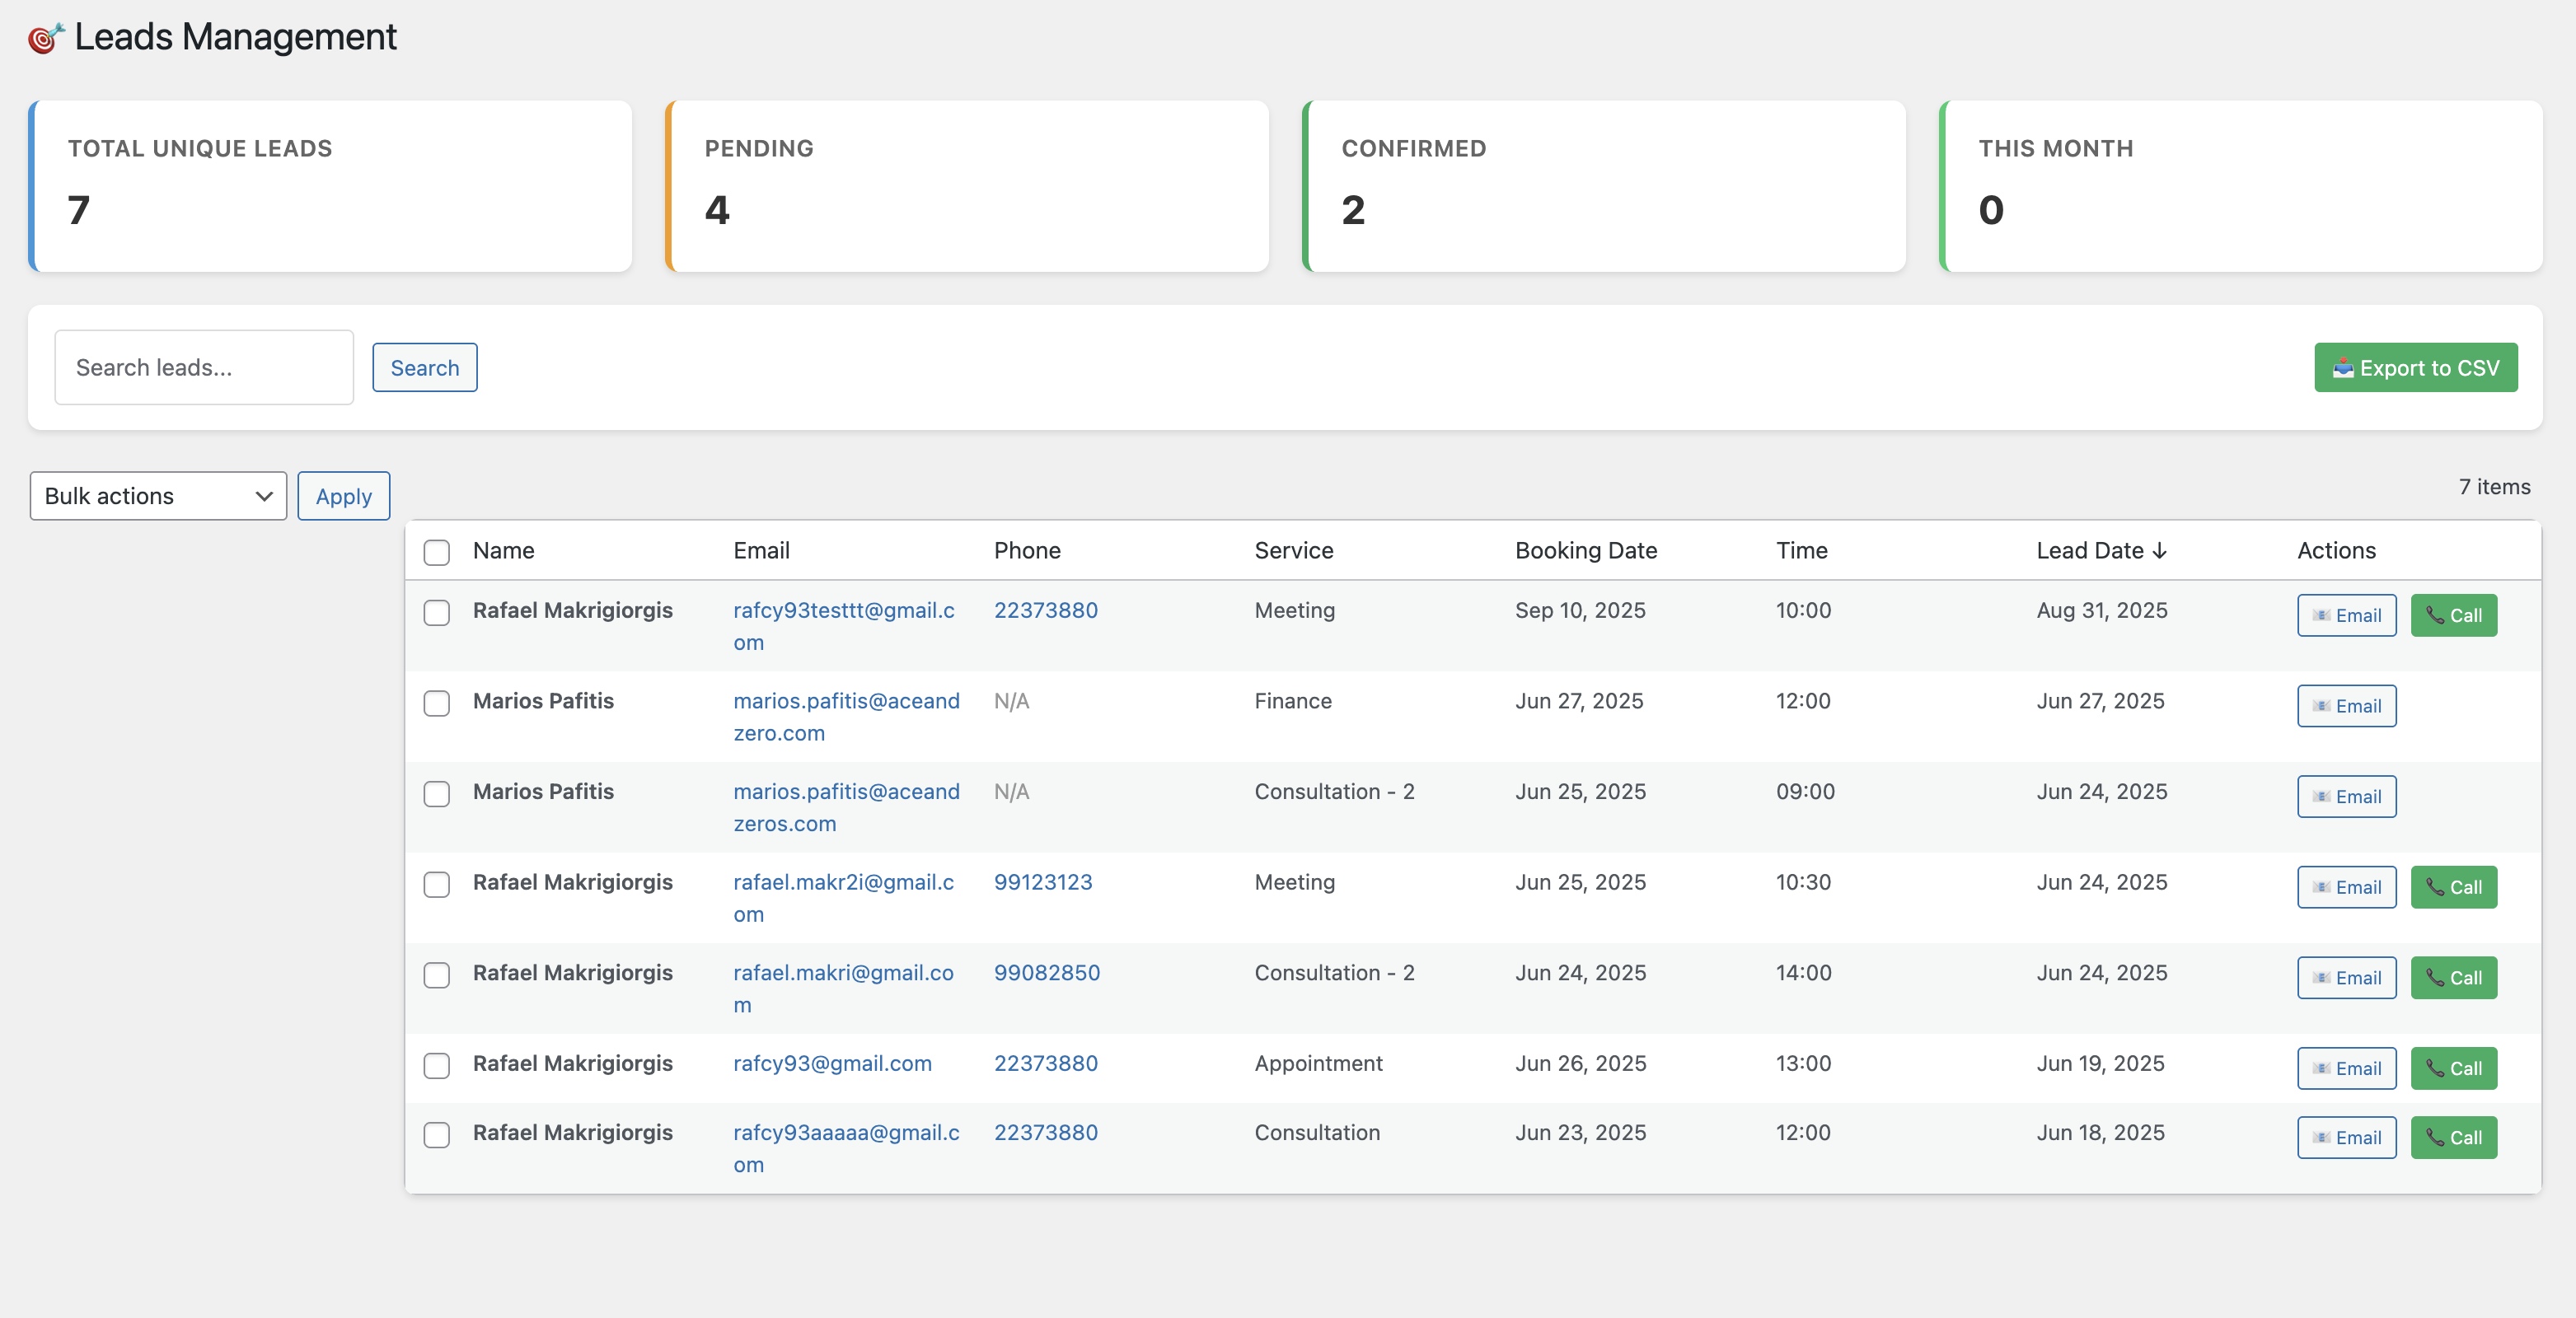
Main Sections: - Appointments: View and manage all bookings - Time Slots: Configure available appointment times - Holidays: Set dates when bookings are not available - Design Settings: Customize the calendar appearance - Email Settings: Configure automated notifications - Booking Rules: Set advance booking restrictions - Calendar Sync: Connect with external calendars - Leads Management: View and export booking data
Managing Time Slots
Time slots determine when clients can book appointments.
Step 1: Access Time Slots Settings
- Click on "Calendar Booking" in the sidebar
- Select "Time Slots" or "Settings"
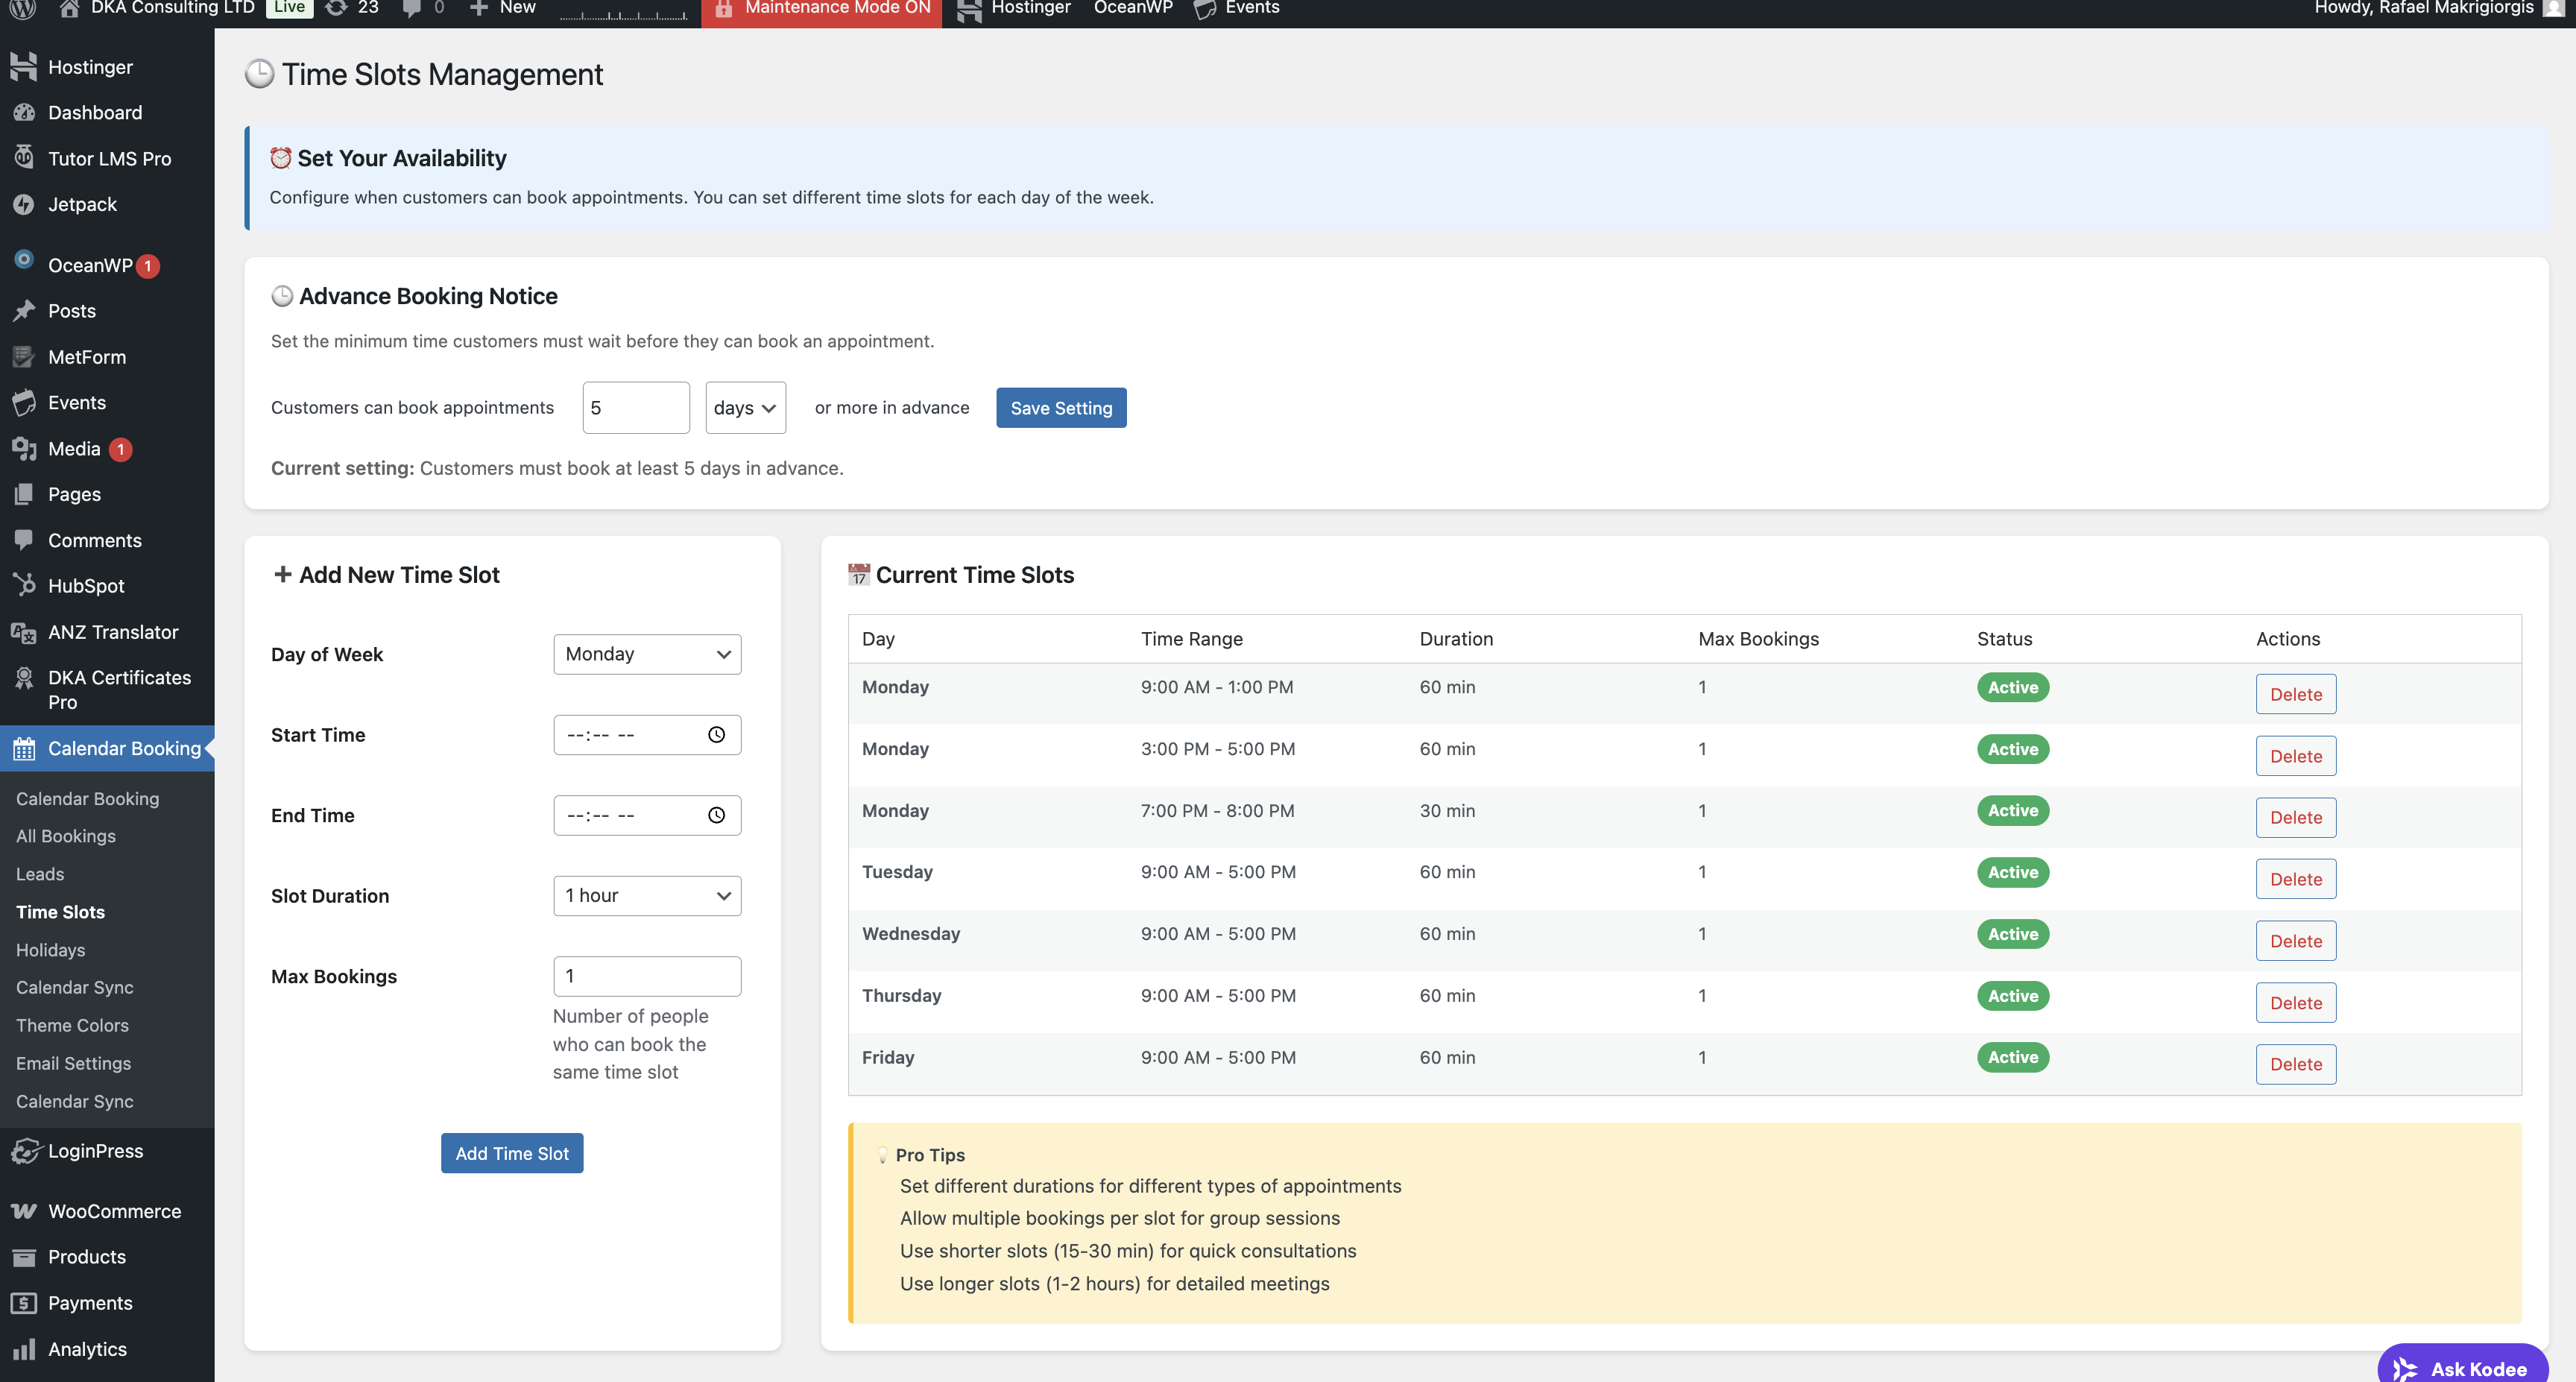
Step 2: Add Available Hours
- Click "Add Time Slot" button
- Select Day(s): Choose which day(s) of the week this applies to
- Monday, Tuesday, Wednesday, Thursday, Friday, Saturday, Sunday
- Start Time: Set when appointments can begin
- End Time: Set when appointments should end
- Slot Duration: Define appointment length (e.g., 30 minutes, 1 hour)
- Break Time (Optional): Set breaks between appointments
Step 3: Multiple Time Slots
- You can add multiple time slots for different days
- Example: Monday-Friday 9:00 AM - 5:00 PM, Saturday 10:00 AM - 2:00 PM
- Each day can have different hours
Step 4: Save Changes
- Review your time slot configuration
- Click "Save Settings" or "Update"
Tip: Consider client convenience and your availability when setting time slots.
Setting Up Holidays
Prevent bookings on specific dates when you're not available.
Step 1: Access Holiday Settings
- Navigate to "Calendar Booking" → "Holidays"
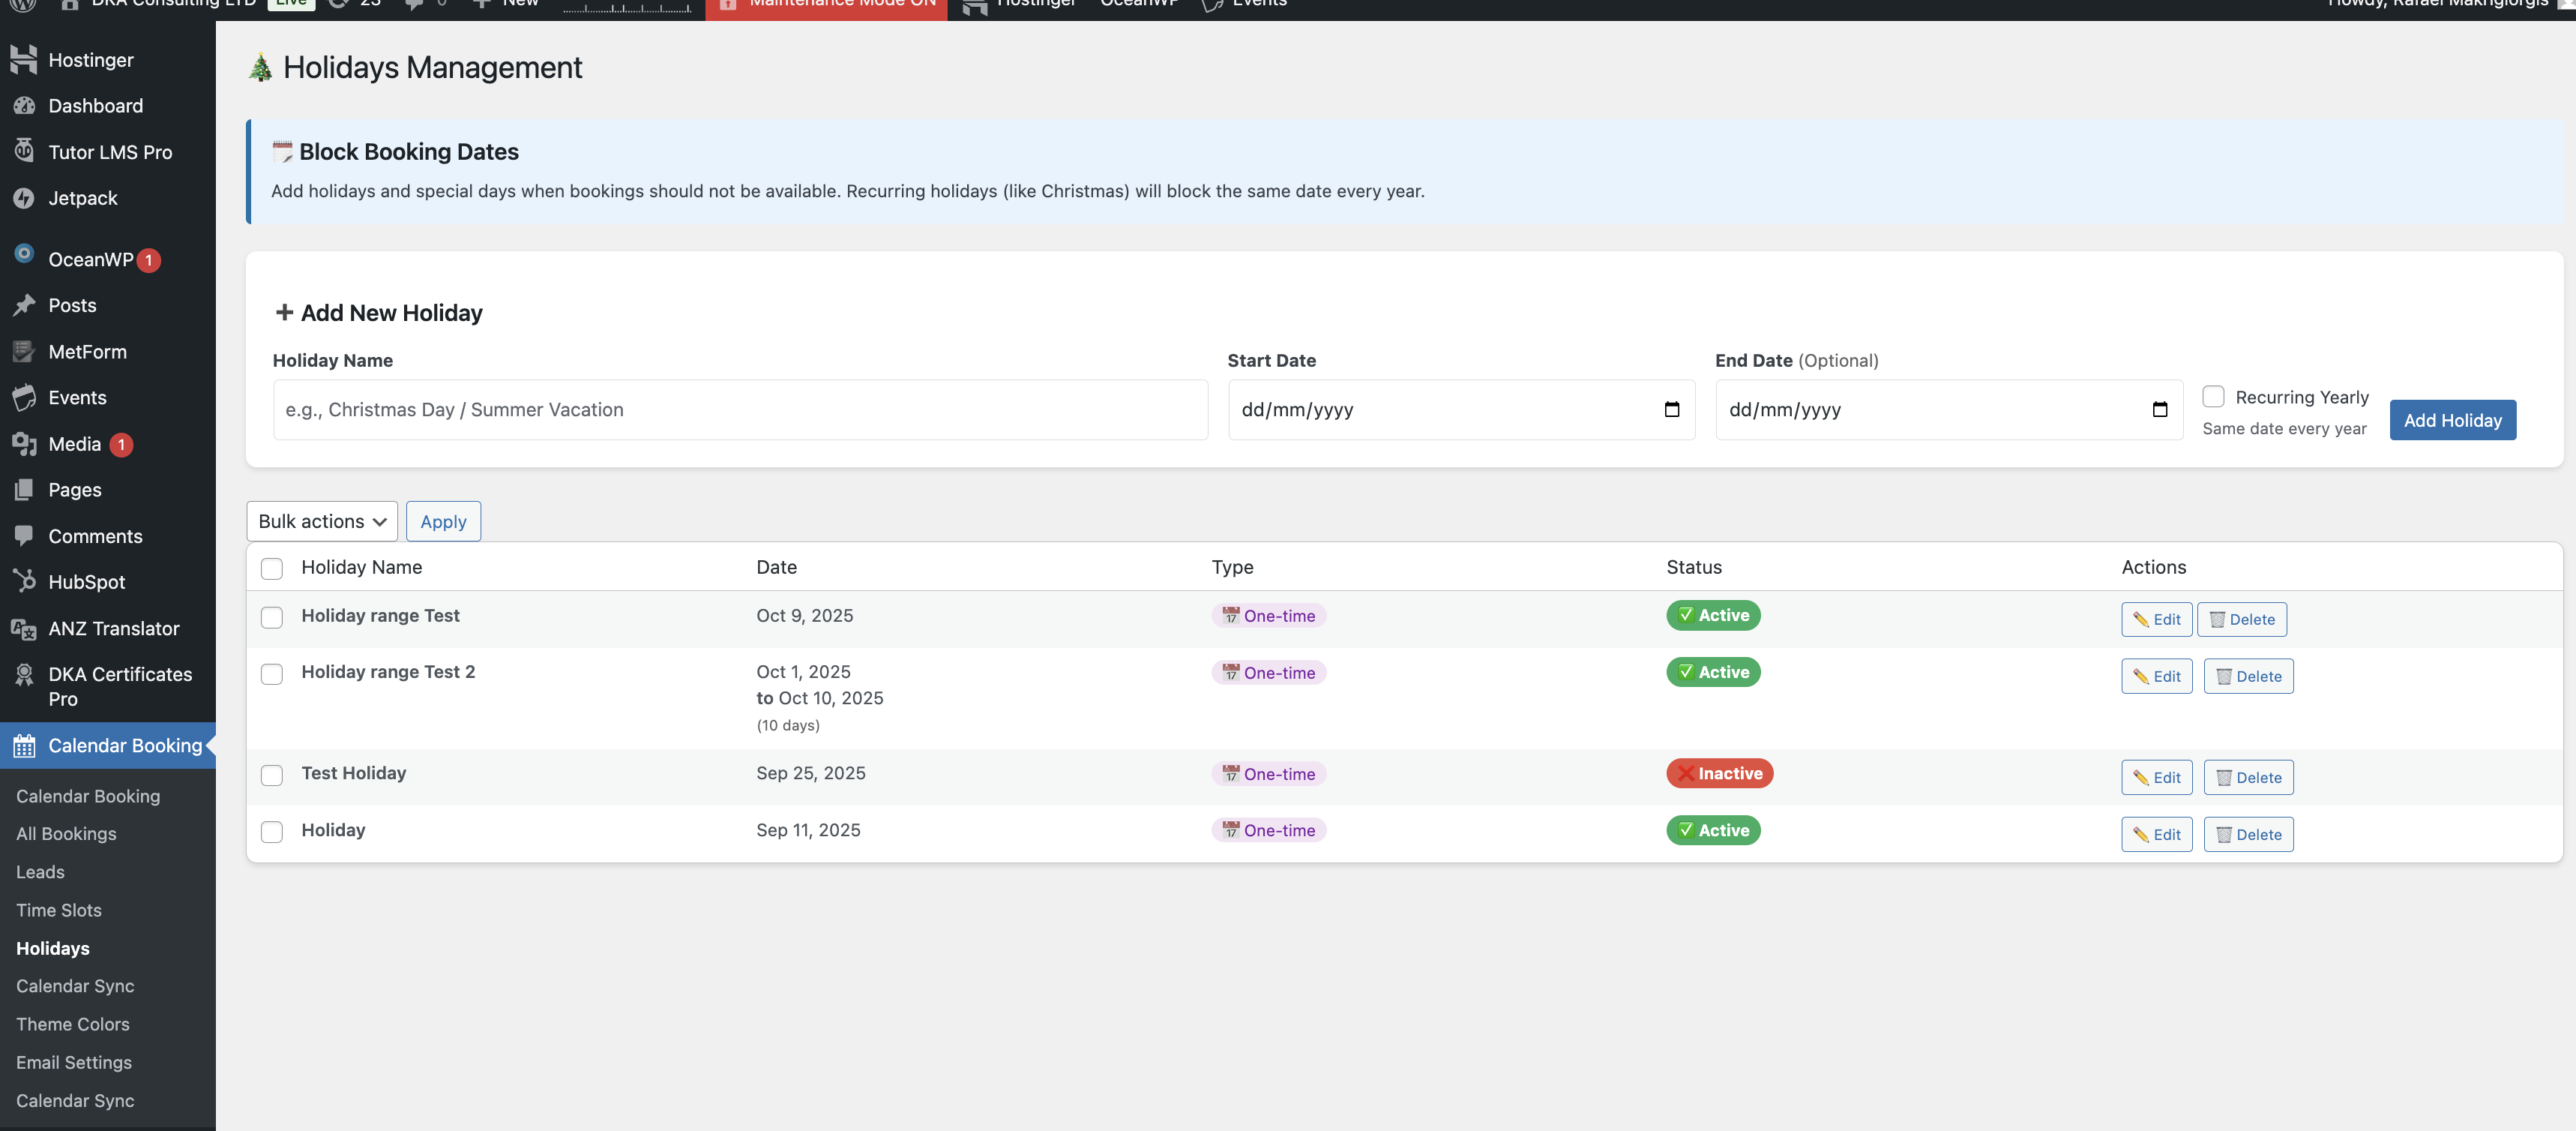
Step 2: Add a Holiday
- Click "Add Holiday" button
- Holiday Name: Enter a descriptive name (e.g., "Christmas Day", "Company Closed")
- Date: Select the date(s) for the holiday
- You can add single days or date ranges
- Recurring (Optional): Check if this holiday repeats annually
Step 3: View All Holidays
- See a list of all configured holidays
- Edit or delete holidays as needed
- Holidays will automatically block bookings on those dates
Step 4: Save Your Holiday List
- Click "Save" or "Update"
- The calendar will automatically block these dates from booking
Examples of Holidays to Add: - National holidays - Company closure dates - Personal vacation days - Maintenance days
Customizing Calendar Design
Make the booking calendar match your brand and website design.
Step 1: Access Design Settings
- Go to "Calendar Booking" → "Design Settings" or "Customization"
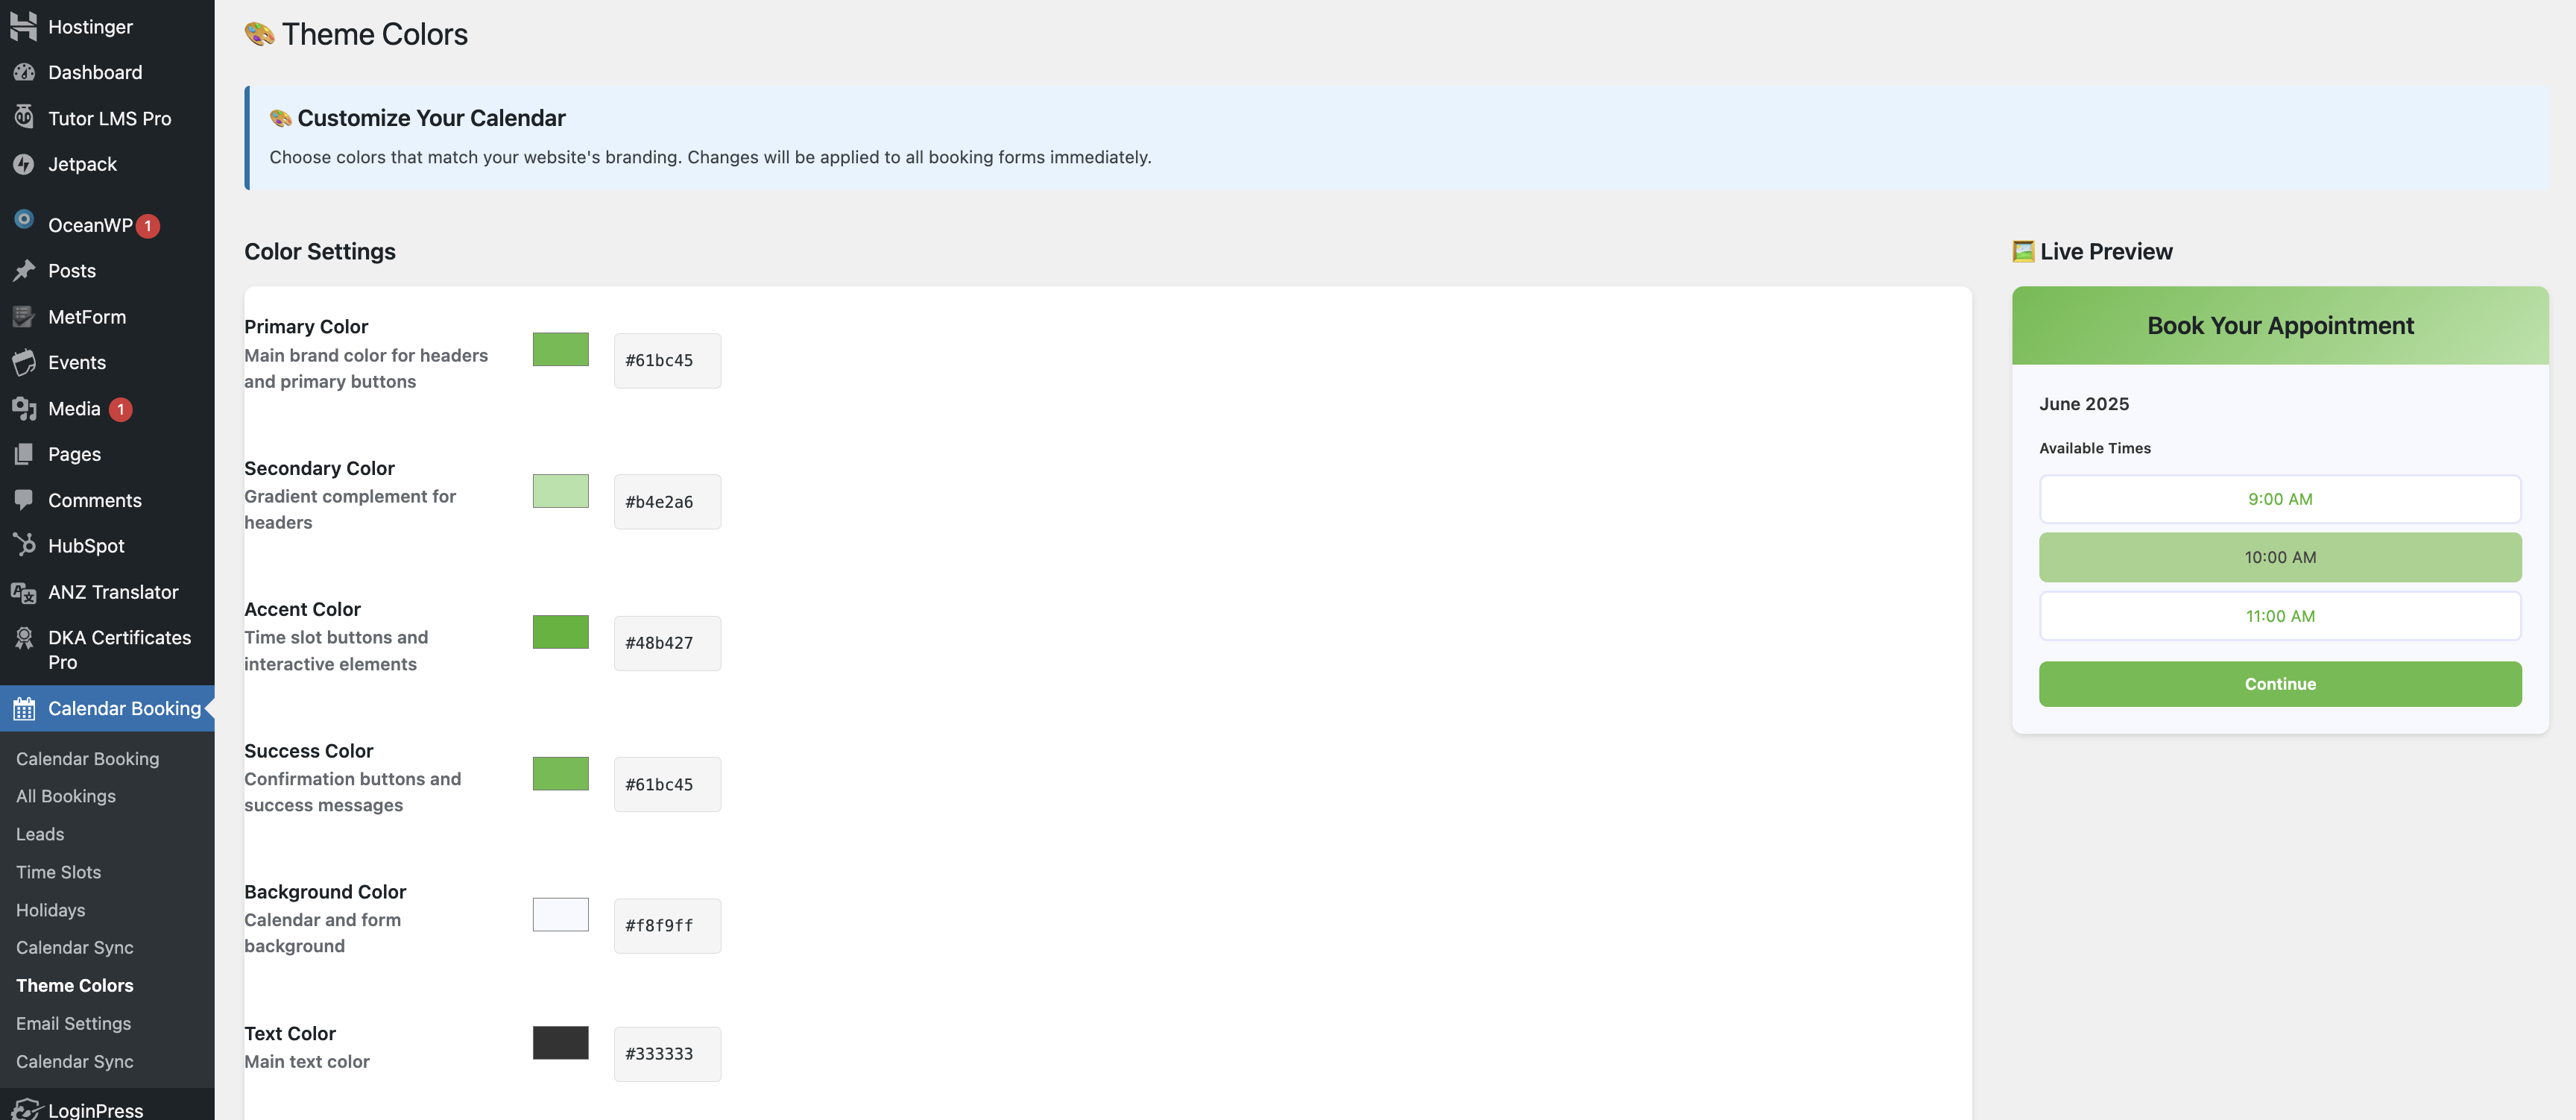
Step 2: Color Customization
Configure the calendar's color scheme: - Primary Color: Main theme color for the calendar - Secondary Color: Accent colors for buttons and highlights - Background Color: Calendar background - Text Color: Font color for readability - Available Slot Color: Color for bookable time slots - Booked Slot Color: Color for already reserved times - Holiday Color: Color to mark holidays
Step 3: Typography Settings
- Font Family: Choose the font style
- Font Size: Adjust text size for readability
- Heading Style: Customize calendar headers
Step 4: Layout Options
- Calendar View: Month view, week view, or day view
- Time Format: 12-hour or 24-hour format
- First Day of Week: Start on Sunday or Monday
- Button Style: Rounded, square, or custom
Step 5: Preview and Save
- Many design panels offer a preview option
- Review how your changes look
- Click "Save Design Settings"
Design Tips: - Use brand colors for consistency - Ensure sufficient contrast for readability - Test on mobile devices to ensure responsiveness
Managing Appointments
Handle all booking requests, confirmations, and cancellations.
Step 1: View All Appointments
- Navigate to "Calendar Booking" → "Appointments"
You'll see a list of all appointments with: - Client name and contact information - Appointment date and time - Status (Pending, Confirmed, Cancelled) - Booking reference number
Step 2: Appointment Status Management
For New/Pending Appointments: 1. Click on the appointment to view details 2. Review client information 3. Choose an action: - Confirm: Accept the appointment - Cancel: Reject or cancel the appointment - Reschedule: Move to a different time
Status Indicators: - 🟡 Pending: Awaiting confirmation - 🟢 Confirmed: Appointment is confirmed - 🔴 Cancelled: Appointment was cancelled - 🔵 Completed: Appointment has passed
Step 3: Confirm an Appointment
- Click on a pending appointment
- Click the "Confirm" button
- Optional: Add a confirmation message
- An automatic email is sent to the client
- The appointment status changes to "Confirmed"
Step 4: Cancel an Appointment
- Select the appointment
- Click "Cancel" or "Reject"
- Optional: Provide a cancellation reason
- The client receives a cancellation notification
- The time slot becomes available again
Step 5: Edit Appointment Details
- Click on any appointment
- You can modify:
- Date and time
- Client contact information
- Appointment notes
- Click "Update" to save changes
Viewing and Downloading Leads
Track all booking inquiries and export data for analysis.
Step 1: Access Leads Section
- Go to "Calendar Booking" → "Leads" or "All Bookings"
Step 2: View Lead Information
Each lead entry contains: - Client name - Email address - Phone number - Requested appointment date and time - Submission date - Current status - Any additional messages or notes
Step 3: Filter Leads
Use filters to find specific leads: - Date Range: View leads from specific periods - Status: Filter by pending, confirmed, cancelled, or completed - Search: Look up by name, email, or phone number
Step 4: Download Leads Data
- Click the "Export" or "Download" button
- Select export format:
- CSV: For Excel and spreadsheet applications
- Excel: Direct .xlsx format
- PDF: For printing or sharing
- Choose date range (optional)
- Click "Download"
Use Cases for Lead Data: - Marketing analysis - Follow-up campaigns - Performance reporting - Client database management - Compliance and record-keeping
Email Notifications
Configure automated emails sent to clients and administrators.
Step 1: Access Email Settings
- Navigate to "Calendar Booking" → "Email Settings"
Step 2: Configure Email for Calendar Sync
The plugin syncs with a connected email calendar (Google Calendar, Outlook, etc.)
Email Sync Features: - Automatically creates calendar events - Sends invites to clients - Updates when appointments are modified - Removes events when appointments are cancelled
Step 3: Customize Email Templates
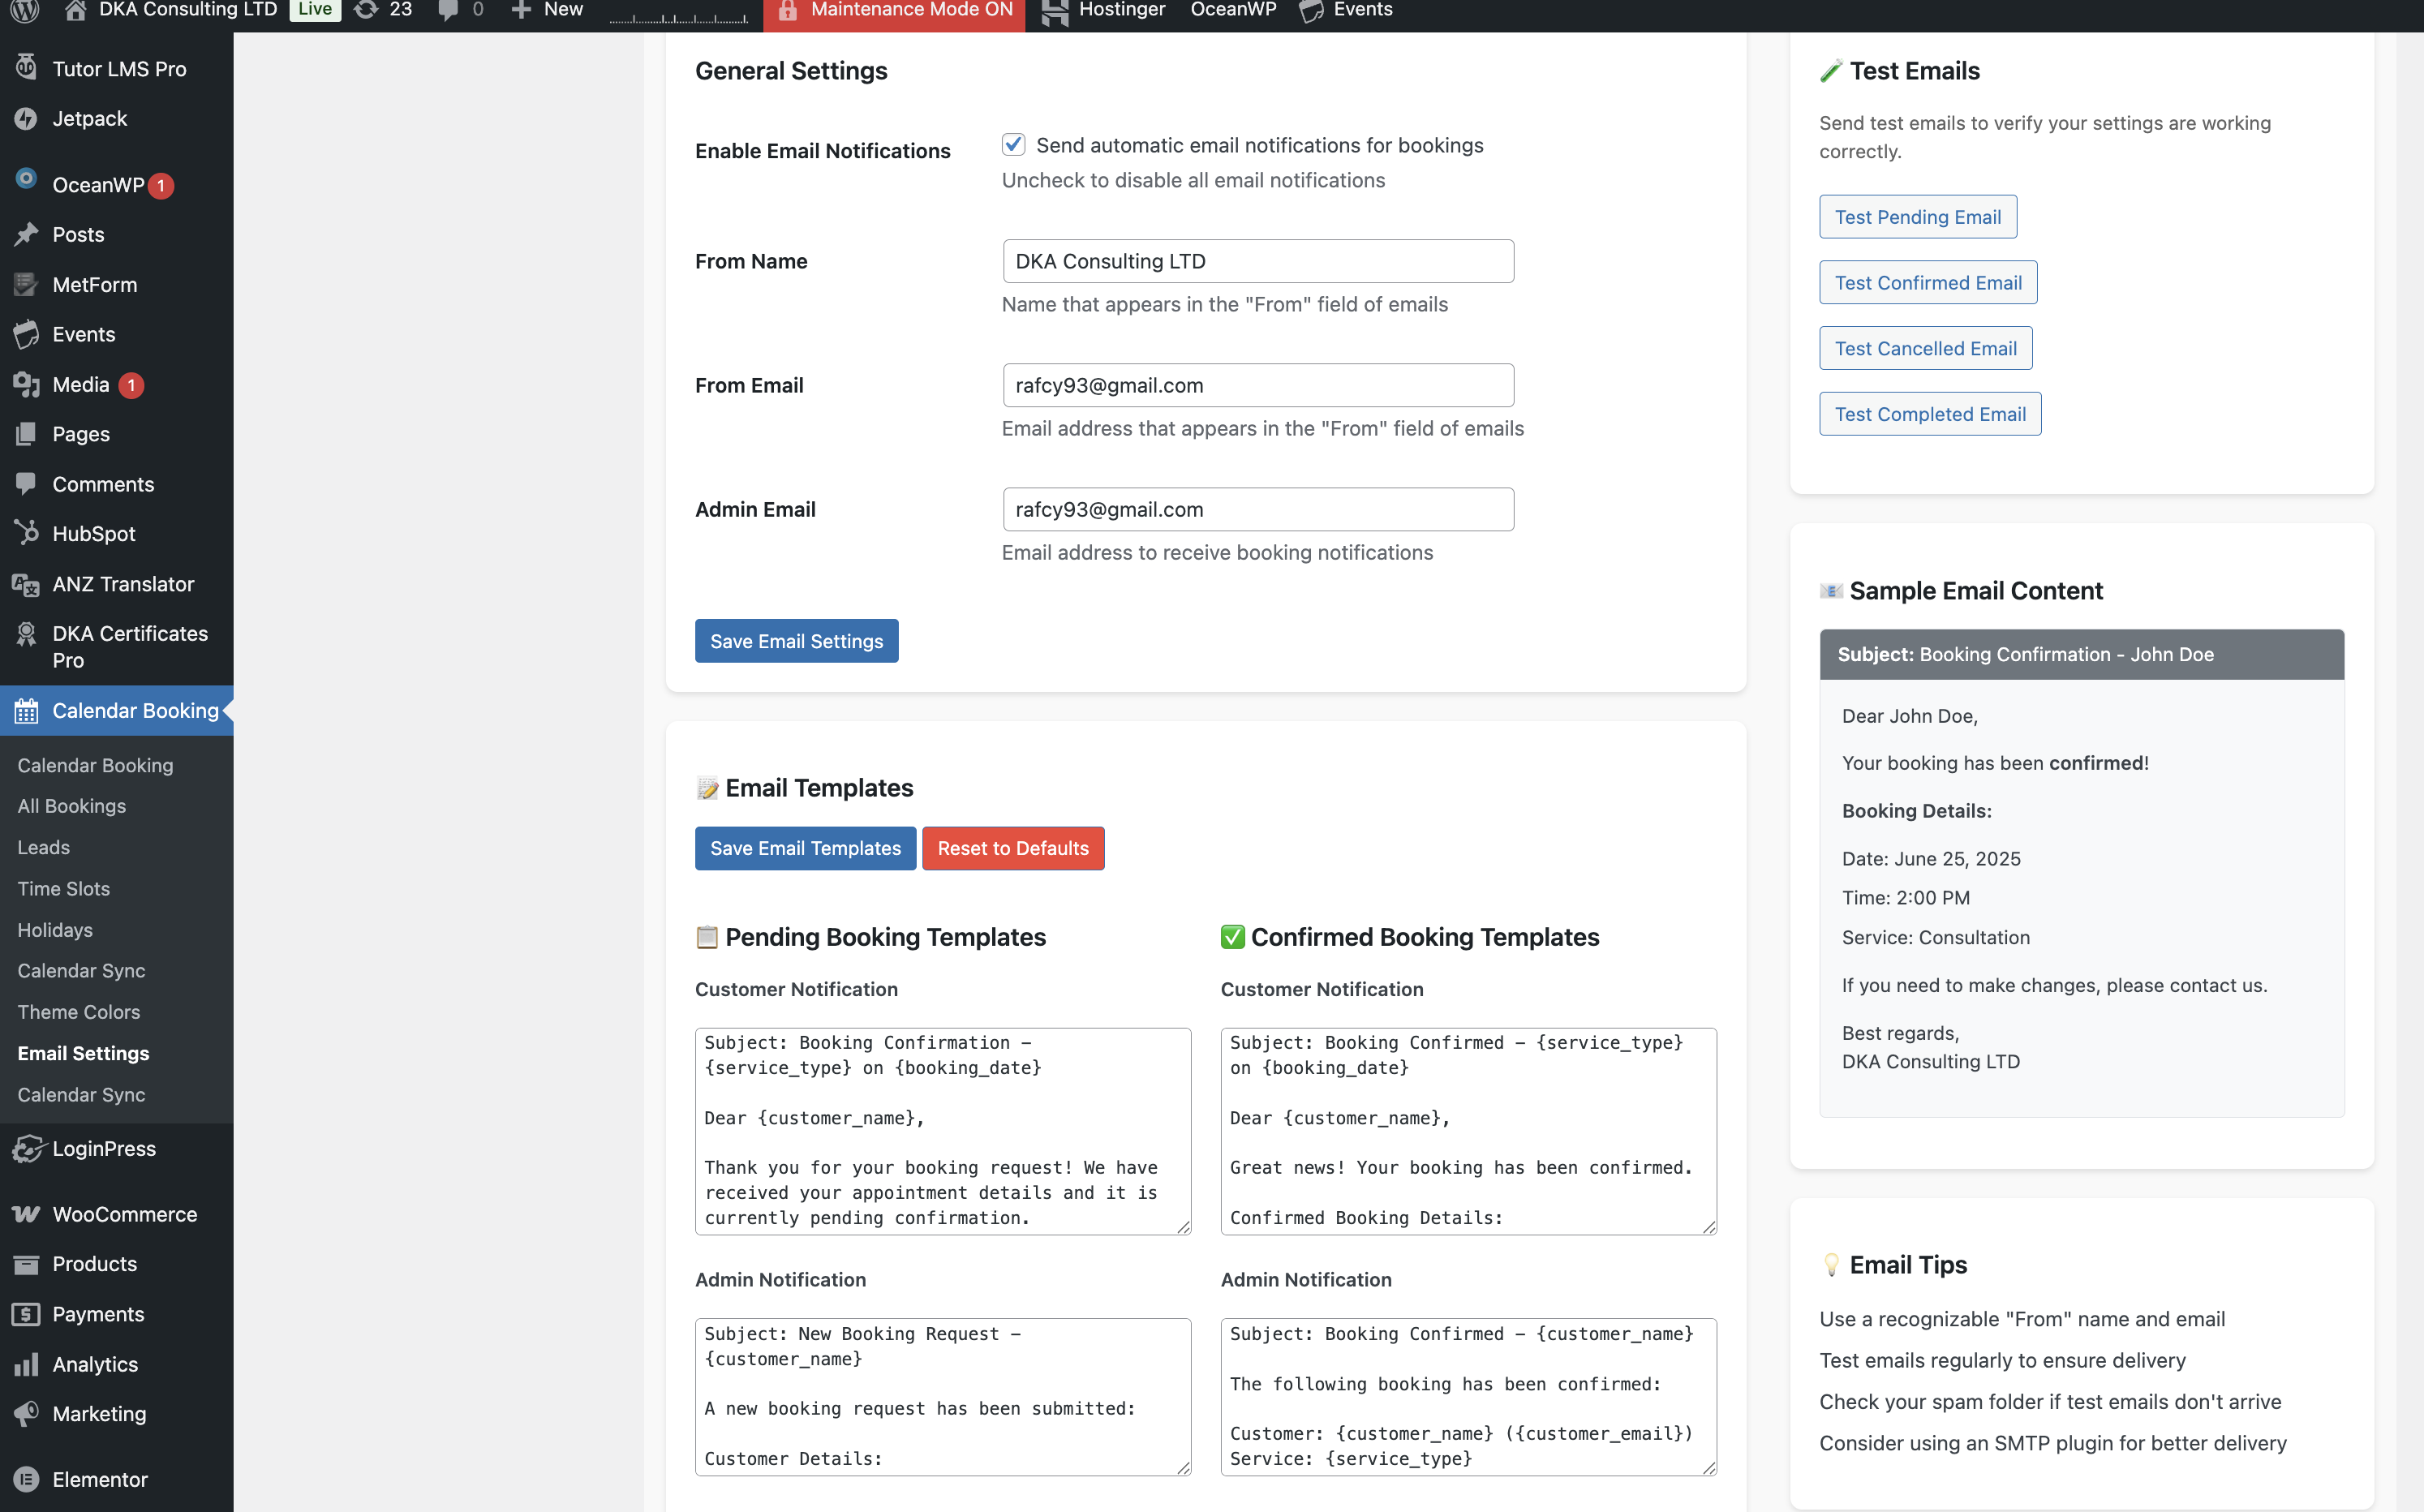
Confirmation Email:
1. Edit the subject line
2. Customize the email body with:
- Client name placeholder: {client_name}
- Appointment date: {appointment_date}
- Appointment time: {appointment_time}
- Booking reference: {booking_id}
3. Add personalized messages
4. Include business contact information
Example Confirmation Email:
Subject: Your Appointment is Confirmed - {appointment_date}

Dear {client_name},

Your appointment has been confirmed!

Date: {appointment_date}
Time: {appointment_time}
Reference Number: {booking_id}

If you need to reschedule or cancel, please contact us at least 24 hours in advance.

Best regards,
DKA Consult Team
Cancellation Email: - Similar customization options - Offer alternative booking options - Provide contact information for questions
Reminder Email: - Set when reminders are sent (e.g., 24 hours before) - Include appointment details - Add any preparation instructions
Step 4: Admin Notifications
Configure emails sent to administrators when: - New booking request is received - Appointment is cancelled by client - Appointment is completed
Step 5: Test Email Settings
- Use the "Send Test Email" feature
- Verify formatting and content
- Check spam folders if emails don't arrive
- Adjust settings as needed
Step 6: Save Email Configuration
Click "Save Email Settings" to apply changes
Booking Availability Settings
Control when clients can start booking appointments in advance.
Step 1: Access Booking Rules
- Go to "Calendar Booking" → "Booking Rules" or "Settings"
Step 2: Set Advance Booking Window
Minimum Advance Booking: - Prevent last-minute bookings - Example: "Clients must book at least 24 hours in advance" - Helps with scheduling and preparation
Maximum Advance Booking: - Limit how far in advance clients can book - Example: "Clients can book up to 8 days forward" - Useful for maintaining flexibility in your schedule
Step 3: Configure the Setting
- Find "Advance Booking Days" or similar setting
- Enter the number of days: 8 (or your preferred number)
- This means clients can see and book appointments starting 8 days from today
Example Scenario: - Today is November 7 - With 8 days forward setting - Clients can book from November 15 onwards - Dates before November 15 are not shown or are disabled
Step 4: Same-Day Booking
- Enable or disable same-day appointments
- Set cutoff time (e.g., "no same-day bookings after 2 PM")
Step 5: Buffer Time
- Set minimum time between appointments
- Allows for preparation, cleanup, or travel time
- Example: 15-minute buffer between appointments
Step 6: Maximum Bookings
- Limit bookings per day
- Limit bookings per client (per day/week/month)
- Prevents overbooking and spam
Step 7: Save Settings
Click "Update" or "Save Booking Rules"
Benefits of Advance Booking Control: - Better schedule management - Time for client preparation - Reduced no-shows - Flexibility for schedule changes
Calendar Synchronization
Sync with external calendars to prevent double-booking and keep your schedule updated.
Step 1: Connect External Calendar
- Navigate to "Calendar Booking" → "Calendar Sync" or "Integration"
- Choose your calendar service:
- Google Calendar
- Microsoft Outlook Calendar
- Apple Calendar (iCal)
Step 2: Authenticate
- Click "Connect to [Calendar Service]"
- Sign in to your calendar account
- Grant necessary permissions
- Authorize the connection
Step 3: Fetch External Events
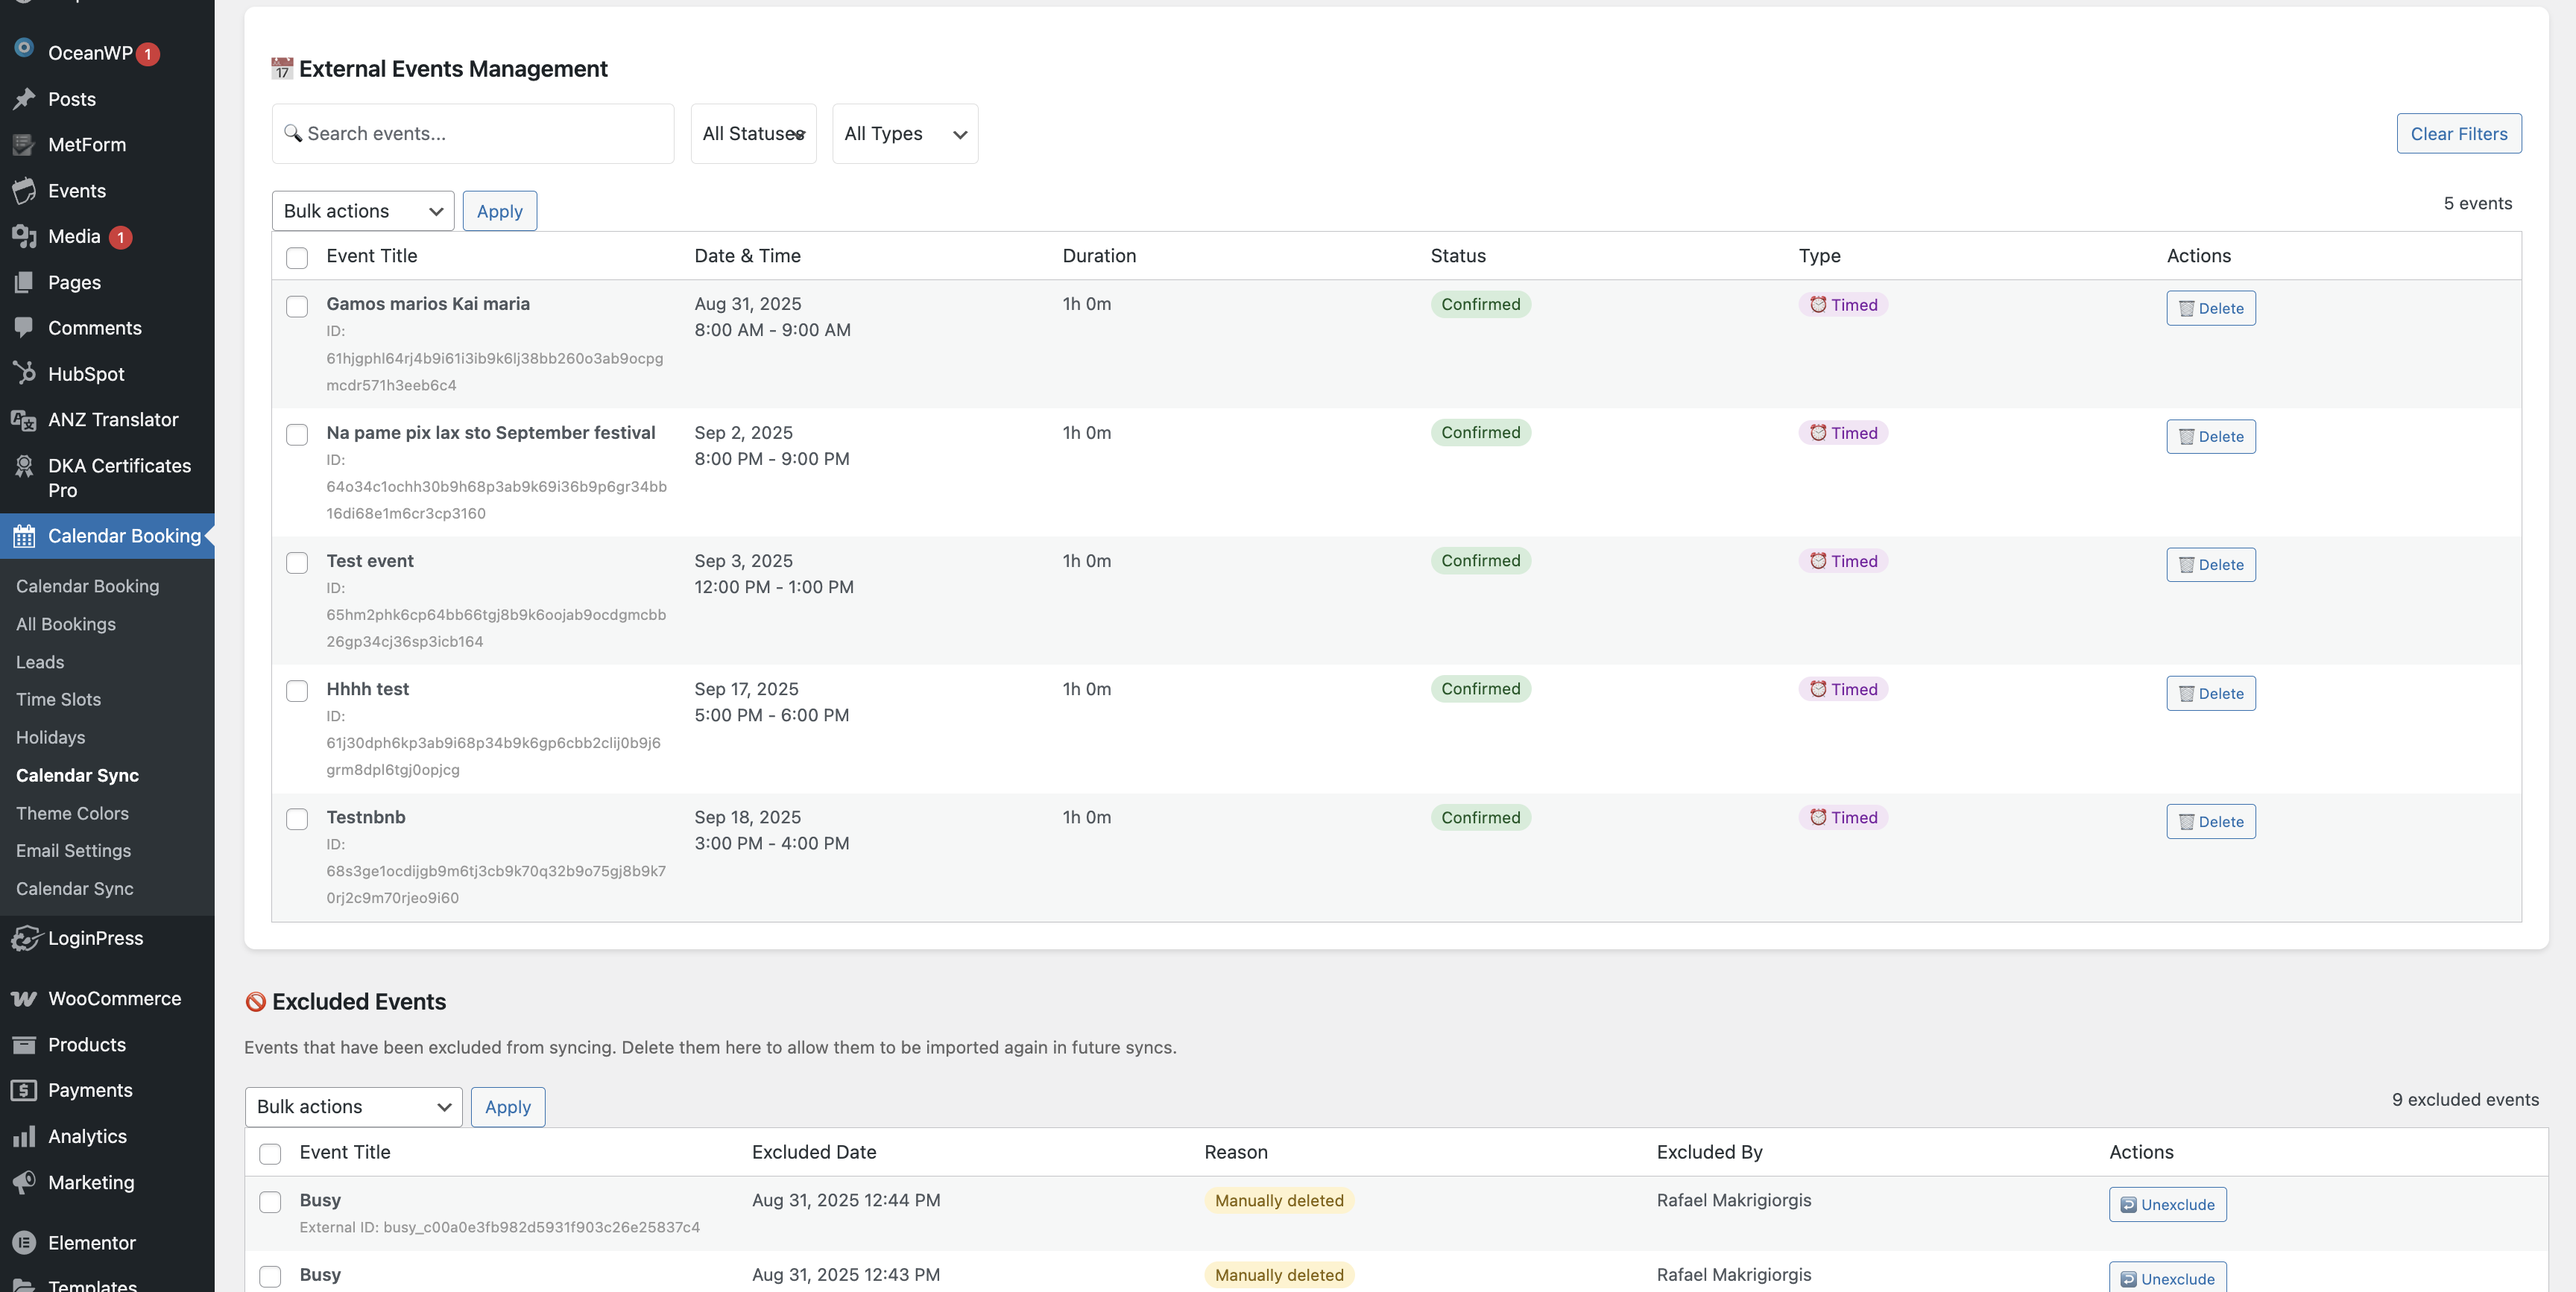
The plugin will automatically fetch events from your synced calendar: - Personal appointments - Work meetings - Other commitments - Existing bookings from other sources
Step 4: Prevent Conflicts
Automatic Conflict Prevention: - Events from your external calendar appear as "busy" slots - Clients cannot book during these times - Reduces double-booking risks - Keeps your schedule accurate
Step 5: Two-Way Sync
When enabled: - New bookings from the website are added to your external calendar - Events created in your external calendar block booking slots - Updates sync in real-time or at set intervals
Step 6: Sync Frequency
Configure how often the plugin checks for updates: - Real-time (immediate) - Every 15 minutes - Every hour - Manual sync
Step 7: Calendar Event Details
When creating events in your synced calendar: - Client name - Appointment type/service - Contact information - Booking reference number
Step 8: Troubleshooting Sync
If sync isn't working: - Check calendar permissions - Re-authenticate the connection - Verify internet connectivity - Check sync logs for errors
Sync Benefits: - Centralized schedule management - Automatic updates across platforms - Mobile access to appointments - Reduced administrative work
Best Practices
For Optimal Booking Management
Schedule Setup: - ✅ Set realistic time slots that you can consistently maintain - ✅ Include buffer time between appointments - ✅ Update holidays well in advance - ✅ Test the booking process from a client's perspective
Appointment Management: - ✅ Respond to booking requests promptly (within 24 hours) - ✅ Confirm appointments as soon as possible - ✅ Send reminder emails 24-48 hours before appointments - ✅ Keep client information confidential and secure
Design and User Experience: - ✅ Use brand colors for consistency - ✅ Ensure the calendar is mobile-friendly - ✅ Use clear, easy-to-read fonts - ✅ Test on multiple devices and browsers
Communication: - ✅ Set clear expectations in confirmation emails - ✅ Provide contact information for questions - ✅ Include cancellation/rescheduling policies - ✅ Be professional and friendly in all communications
Data Management: - ✅ Regularly download and backup leads data - ✅ Review appointment history for insights - ✅ Clean up old cancelled/completed appointments periodically - ✅ Comply with data protection regulations (GDPR, etc.)
Calendar Sync: - ✅ Keep external calendar updated - ✅ Test sync regularly to ensure it's working - ✅ Use consistent event naming conventions - ✅ Check sync logs for errors
Troubleshooting Common Issues
Issue: Clients can't see available time slots
Solutions: - Check that time slots are properly configured - Verify holidays aren't blocking too many dates - Ensure the advance booking window is set appropriately - Check calendar sync isn't marking all times as busy
Issue: Email notifications not being sent
Solutions: - Verify email settings are configured correctly - Check spam folders - Test with different email addresses - Contact hosting provider about email deliverability
Issue: Calendar sync not working
Solutions: - Re-authenticate the calendar connection - Check calendar permissions - Verify internet connection - Check for plugin updates
Issue: Double bookings occurring
Solutions: - Enable calendar sync - Reduce slot availability - Implement booking confirmation workflow - Check time zone settings
Support and Updates
Getting Help
If you encounter issues: 1. Check this tutorial for guidance 2. Review plugin documentation 3. Contact the plugin developer or support team 4. Contact DKA Consult website administrator
Keeping the Plugin Updated
- Regularly check for plugin updates in WordPress
- Update when new versions are available
- Backup your settings before major updates
- Test functionality after updates
Conclusion
The Calendar Booking Plugin is a comprehensive solution for managing client appointments. With features like customizable time slots, holiday management, design customization, email automation, calendar synchronization, and advance booking controls, you have complete control over your booking system.
Key Takeaways: - Configure time slots and holidays to match your availability - Customize the design to match your brand - Manage appointments efficiently with confirmation/cancellation tools - Use email automation to keep clients informed - Sync with external calendars to prevent conflicts - Control booking advance time to maintain schedule flexibility - Export leads data for analysis and follow-up
By following this tutorial, you can effectively manage your appointment booking system and provide an excellent experience for your clients.
Happy Booking! 📅