Create Certificates Plugin - Admin Tutorial
Overview
The Create Certificates Plugin is a powerful tool designed for bulk creation of custom certificates for course completions. DKA Consult offers various courses and needs to generate professional certificates for participants. This plugin provides comprehensive customization options and efficient bulk processing capabilities.
Table of Contents
- Accessing the Create Certificates Plugin
- Plugin Overview
- Designing Your Certificate Template
- Customizing Certificate Elements
- Adding Certificate Information
- Bulk Certificate Creation
- Managing Recipient Data
- Generating Certificates
- Downloading and Distributing Certificates
- Best Practices
Accessing the Create Certificates Plugin
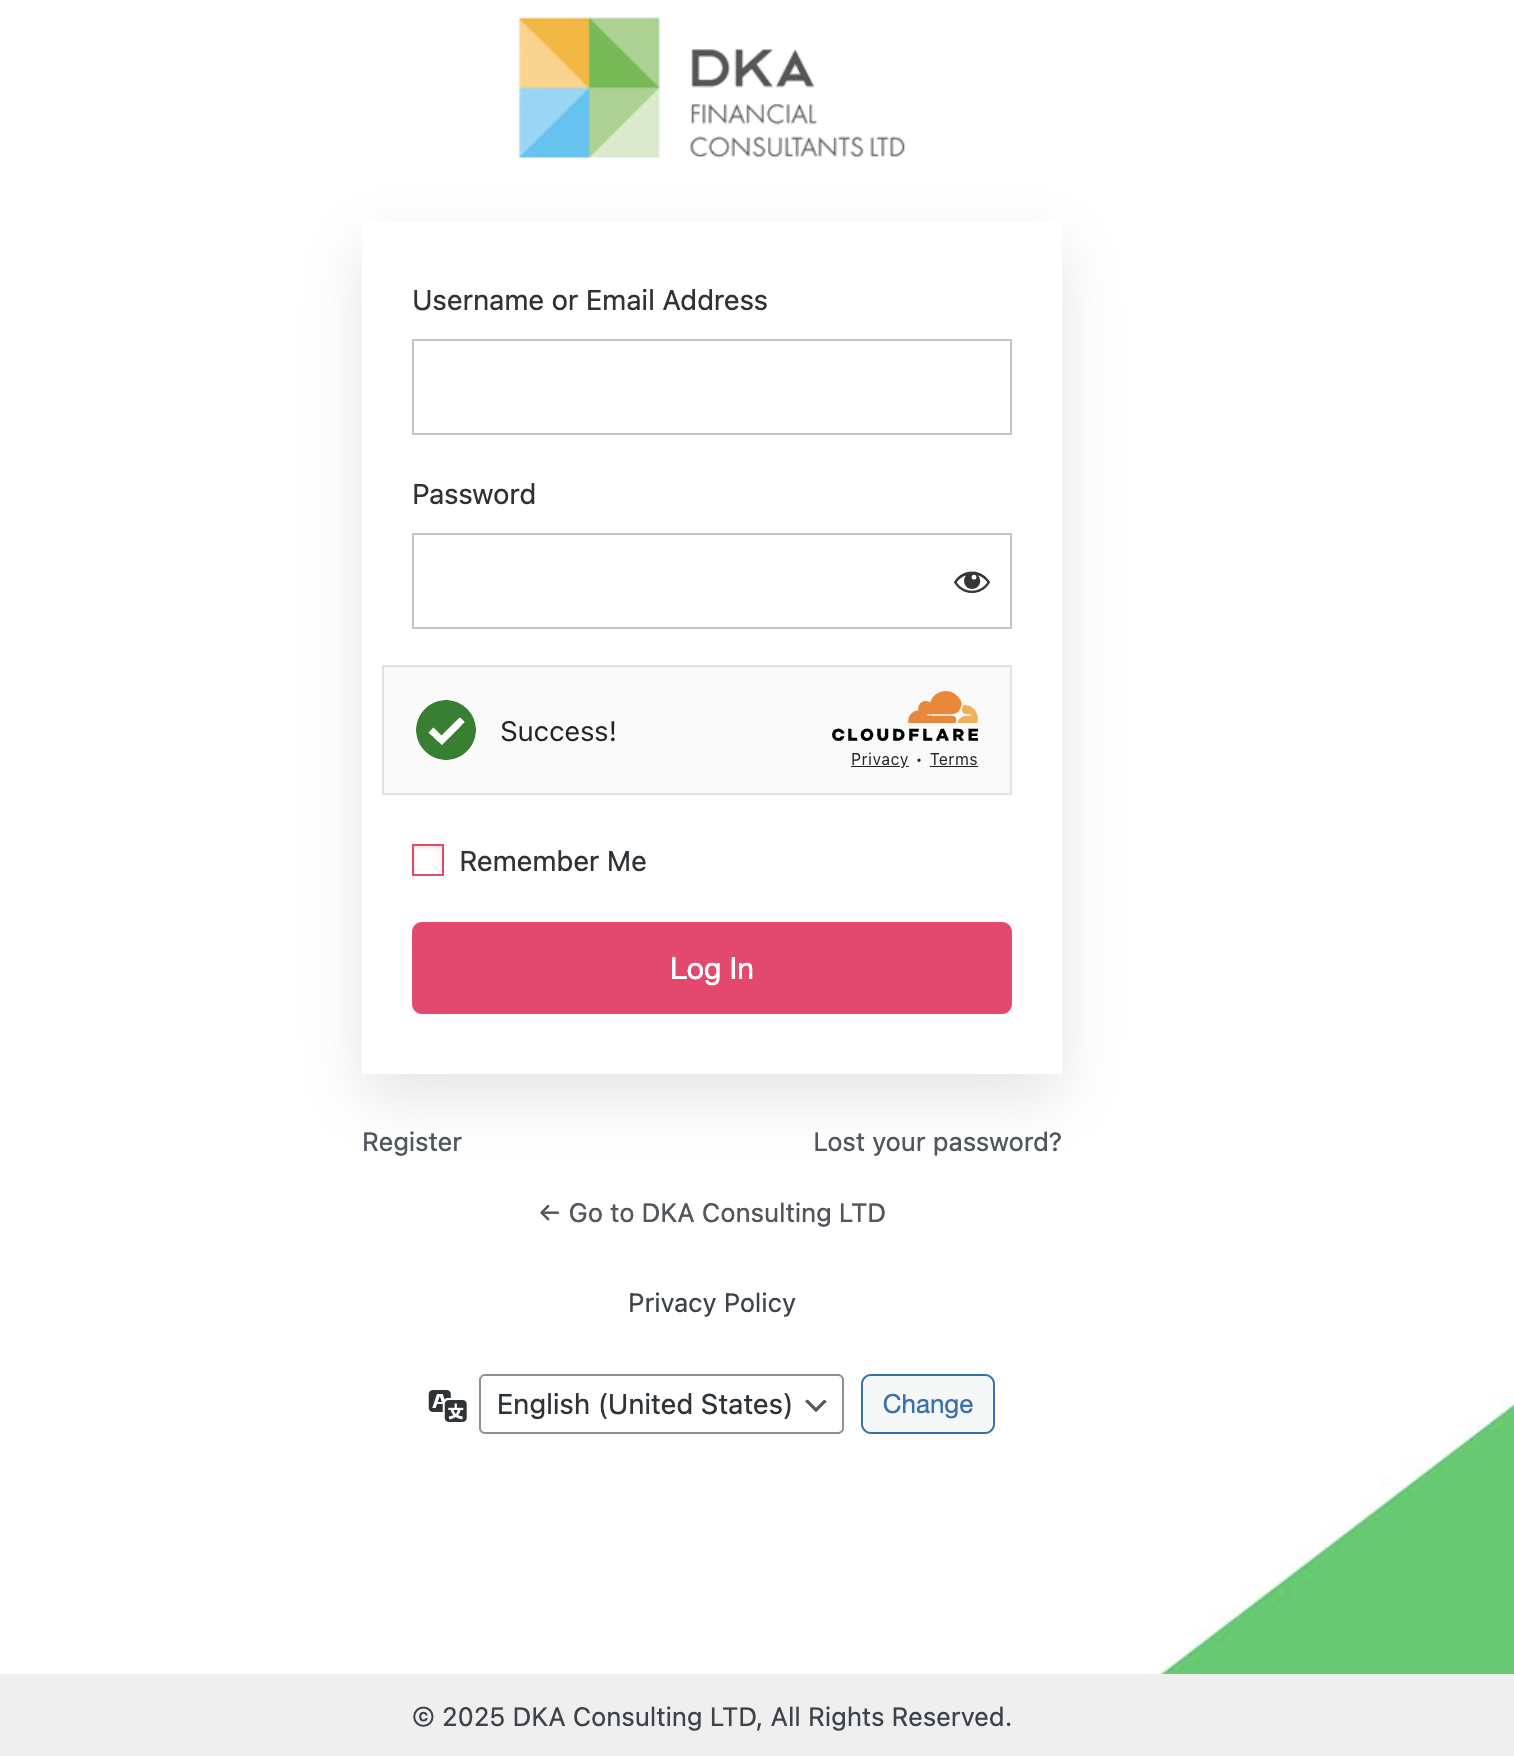
Step 1: Login to WordPress
- Navigate to https://dkaconsult.com/login
- Enter your username and password
- Click "Log In"
Step 2: Open Create Certificates Plugin
- In the WordPress admin dashboard (https://dkaconsult.com/wp-admin)
- Look for "Create Certificates" or "Certificates" in the left sidebar menu
- Click to access the plugin dashboard
Plugin Overview
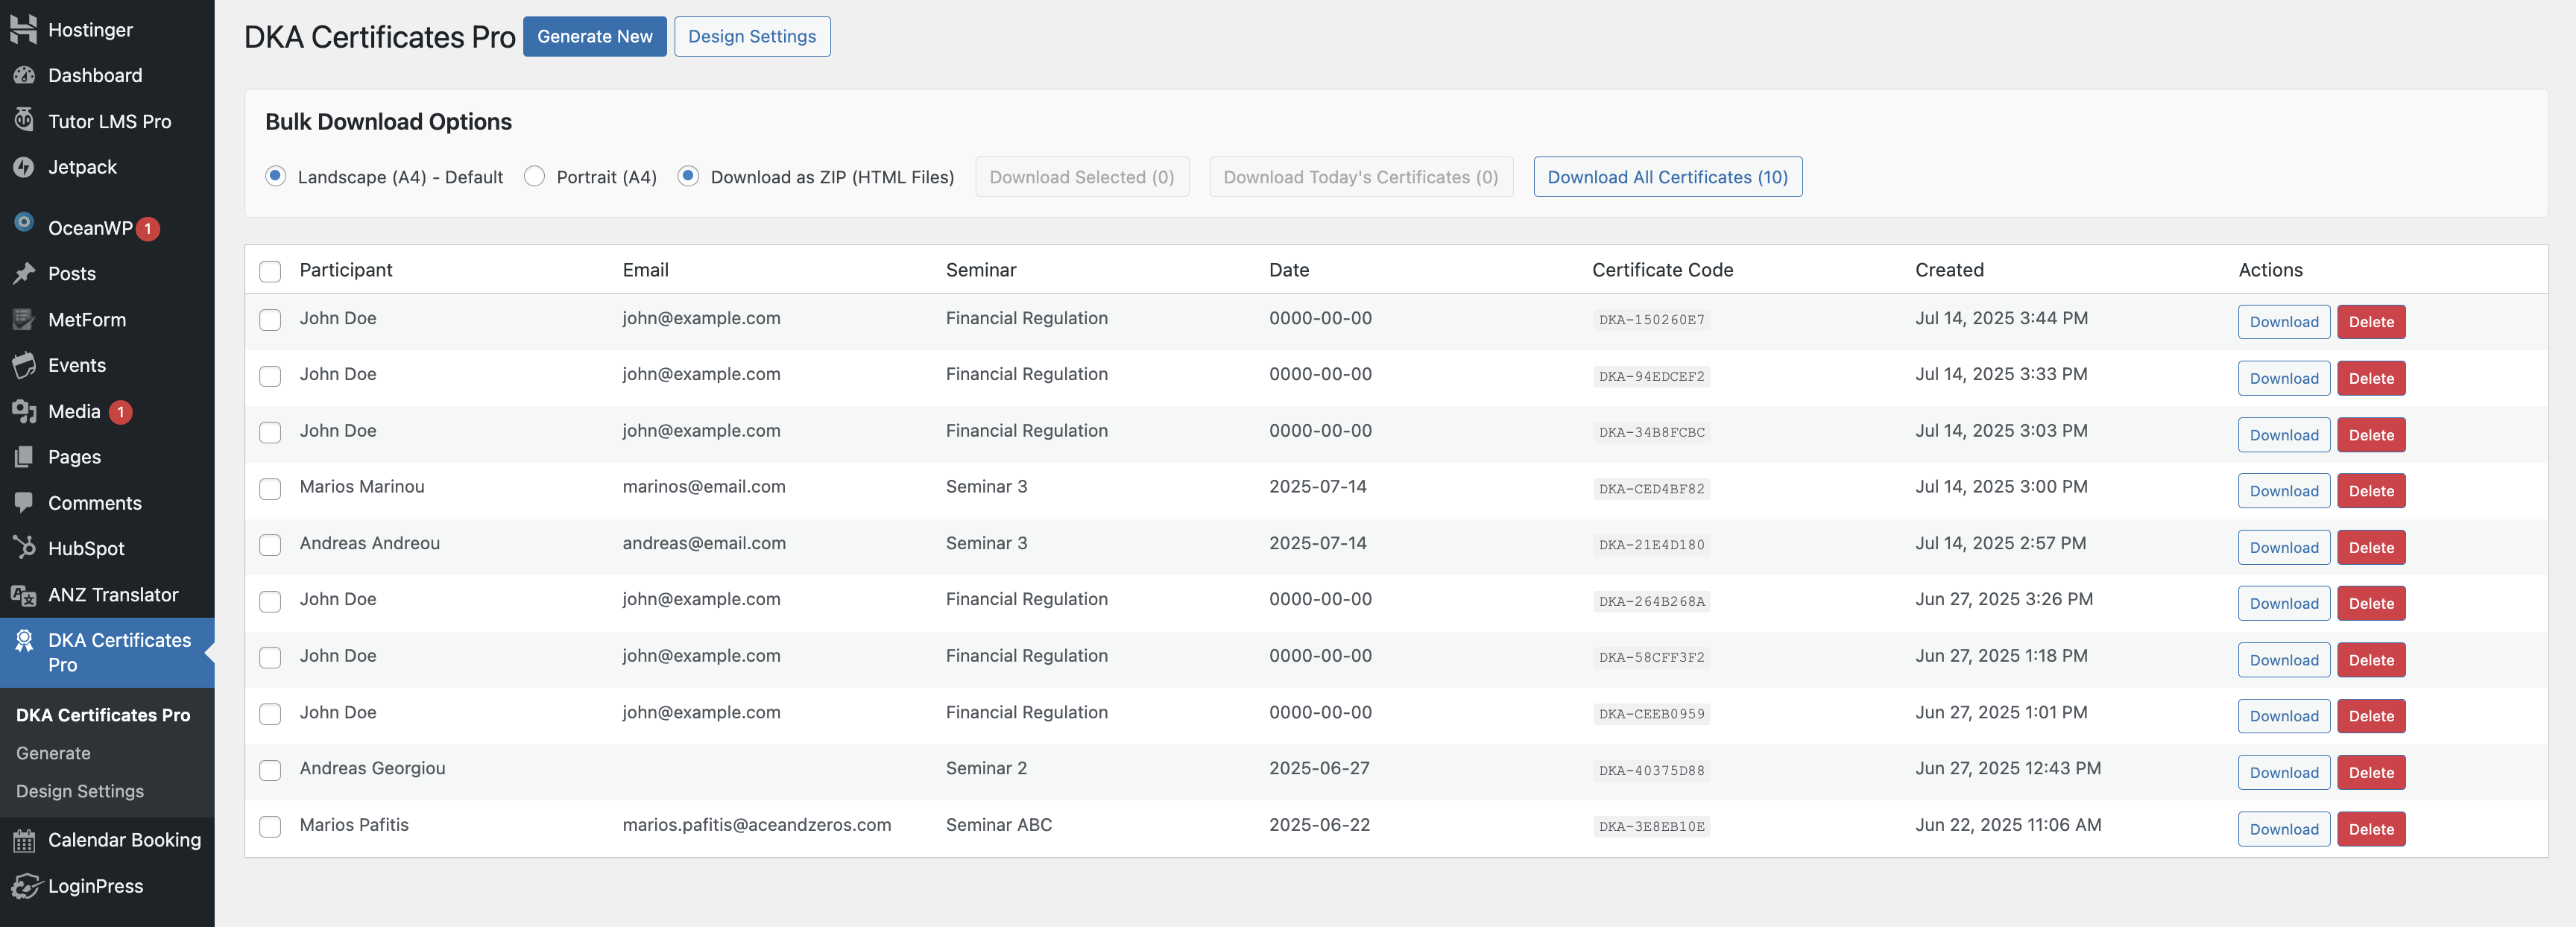
The Create Certificates Plugin provides a comprehensive interface for designing and generating certificates.
Main Features: - Template Designer: Create custom certificate designs - Bulk Operations: Process multiple certificates at once - Data Import: Upload recipient information from spreadsheets - Design Customization: Full control over layout, fonts, colors, and images - Variable Fields: Automatically populate names, dates, course info - Export Options: Download individual or batch certificates - Template Library: Save and reuse certificate designs
Designing Your Certificate Template
Step 1: Start a New Template
- Click "Create New Certificate" or "New Template"
- Choose a starting point:
- Blank Template: Start from scratch
- Pre-made Template: Use a default design
- Import Template: Load a previously saved design
Step 2: Set Certificate Dimensions
- Page Size:
- Standard: Letter (8.5" x 11")
- A4 (210mm x 297mm)
- Custom dimensions
- Orientation:
- Landscape (horizontal) - Most common for certificates
- Portrait (vertical)
Step 3: Background Setup
- Background Color: Choose a solid color
- Background Image: Upload a custom background
- Recommended: High-resolution images (300 DPI)
- Common formats: JPG, PNG
- Consider brand colors and professional appearance
Design Tips: - Light backgrounds work best for readability - Ensure sufficient contrast with text - Use brand-consistent colors - Professional borders or decorative elements enhance appearance
Customizing Certificate Elements
The plugin offers a drag-and-drop design interface with full customization.
Step 1: Adding Text Elements
Certificate Header: 1. Click "Add Text" or drag a text element 2. Enter your header text (e.g., "Certificate of Completion", "Certificate of Achievement") 3. Customize: - Font Family: Choose professional fonts (Times New Roman, Arial, Georgia) - Font Size: Typically 28-36pt for headers - Font Weight: Bold for prominence - Color: Often gold, dark blue, or black - Alignment: Usually centered
Recipient Name Field:
1. Add a text element for the recipient's name
2. Use a placeholder/variable: {recipient_name} or {name}
3. This will be automatically replaced with actual names during generation
4. Customize:
- Font: Elegant script or serif font
- Size: 24-32pt (prominent but not overwhelming)
- Style: Often italics for traditional look
- Position: Typically center of certificate
Certificate Body Text:
Add text for:
- "This is to certify that"
- "Has successfully completed"
- Course name: Use variable {course_name}
- Date: Use variable {completion_date} or {date}
- Hours/Credits: {course_hours} or {credits}
Example structure:
This is to certify that

{recipient_name}

has successfully completed

{course_name}

on {completion_date}

Total Hours: {course_hours}
Step 2: Adding Images and Logos
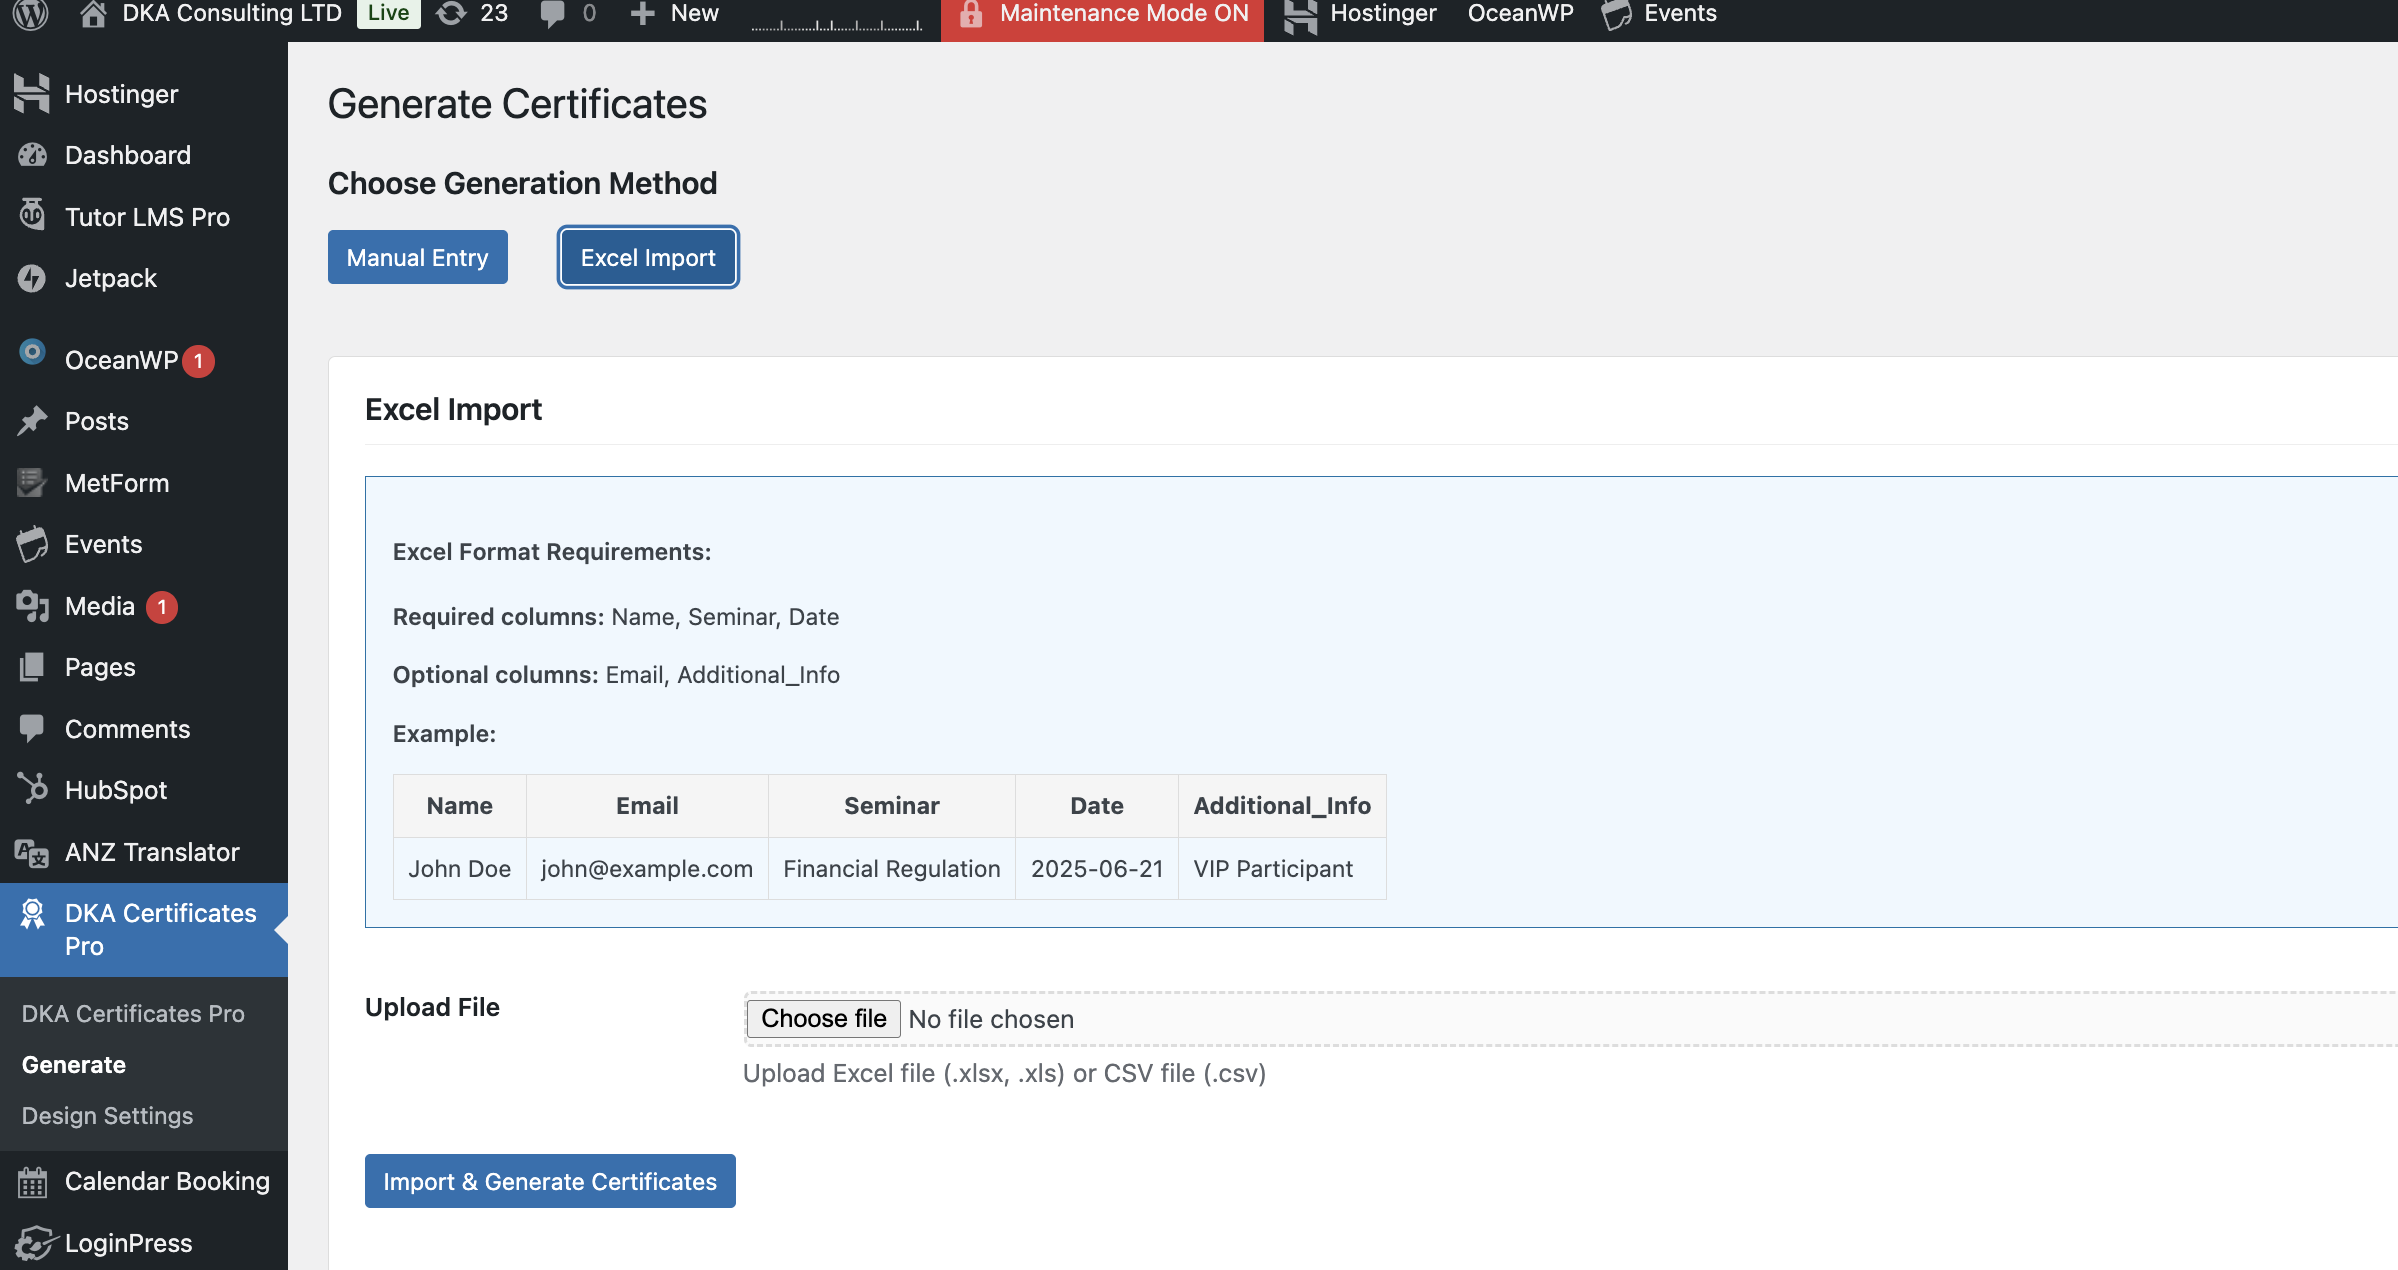
- Click "Add Image" or drag image element
- Company Logo:
- Upload your logo (PNG with transparent background works best)
- Position in top center or top left
- Resize appropriately (usually 150-300px wide)
- Additional Images:
- Seals or stamps
- Accreditation logos
- Decorative elements
- Position and Resize:
- Drag to move elements
- Use corner handles to resize proportionally
- Align using alignment tools
Step 3: Adding Borders and Decorative Elements
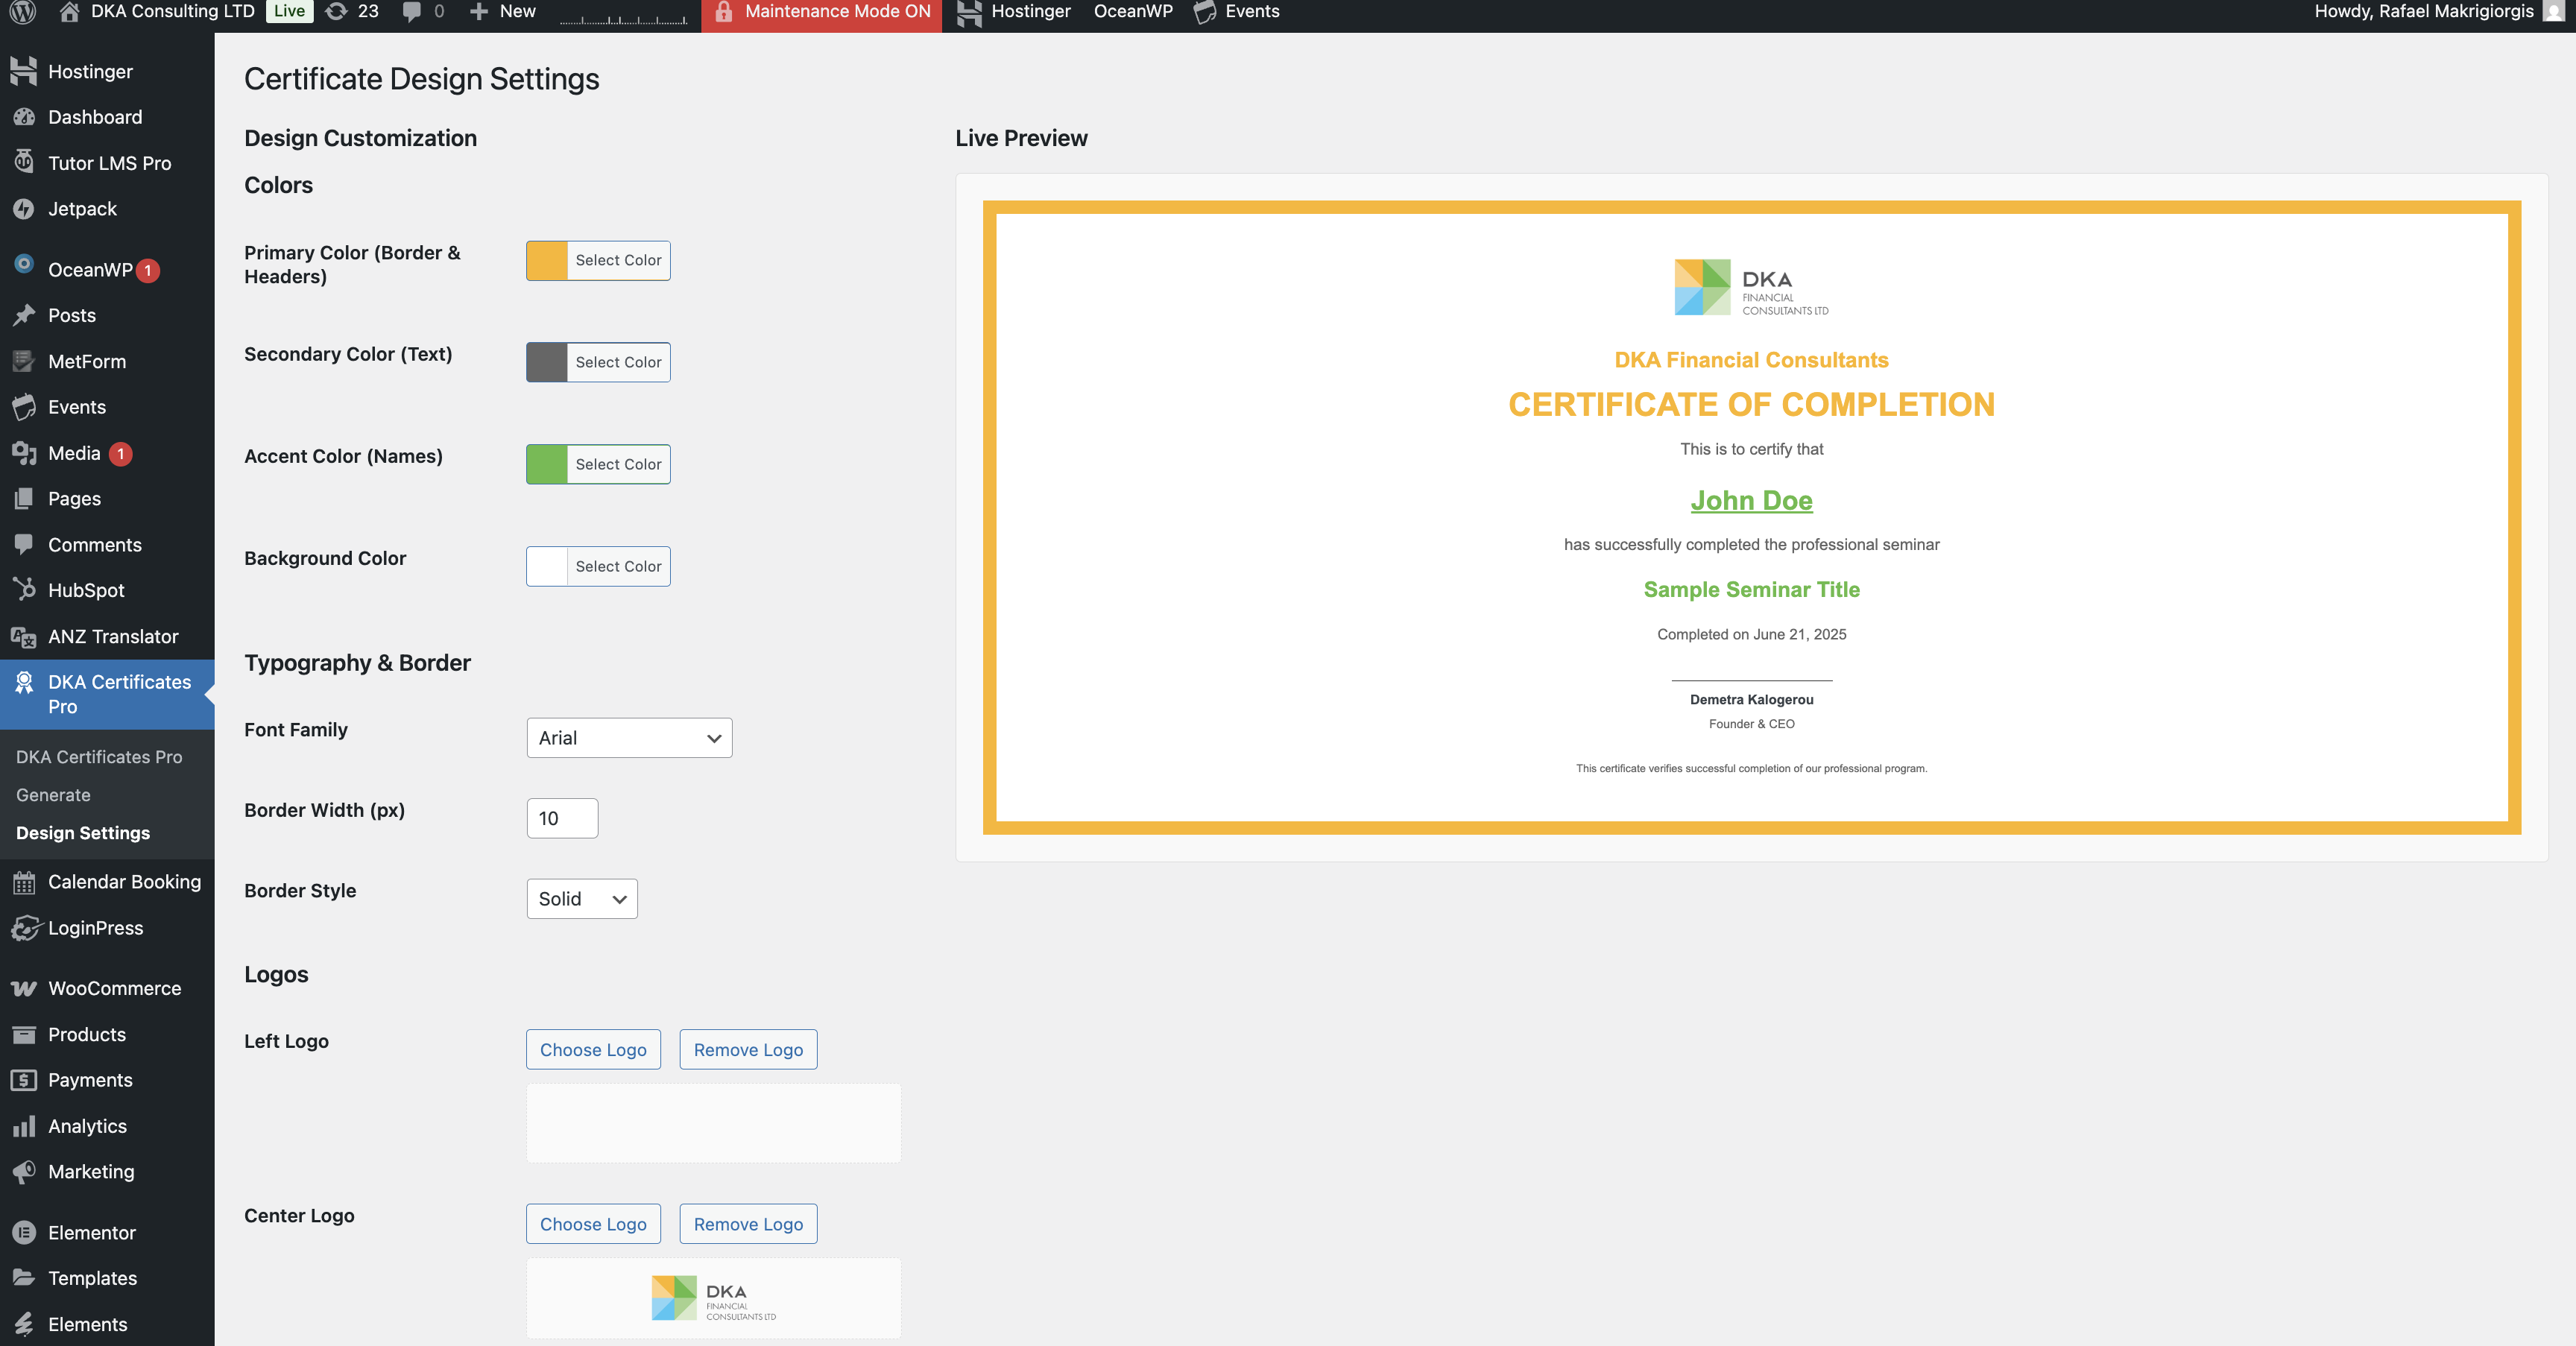
- Border Options:
- Classic single border
- Double borders
- Decorative ornamental borders
- Custom border images
- Adjust Properties:
- Border width/thickness
- Border color
- Corner styles (rounded, square)
- Spacing from edge
Step 4: Signature Lines
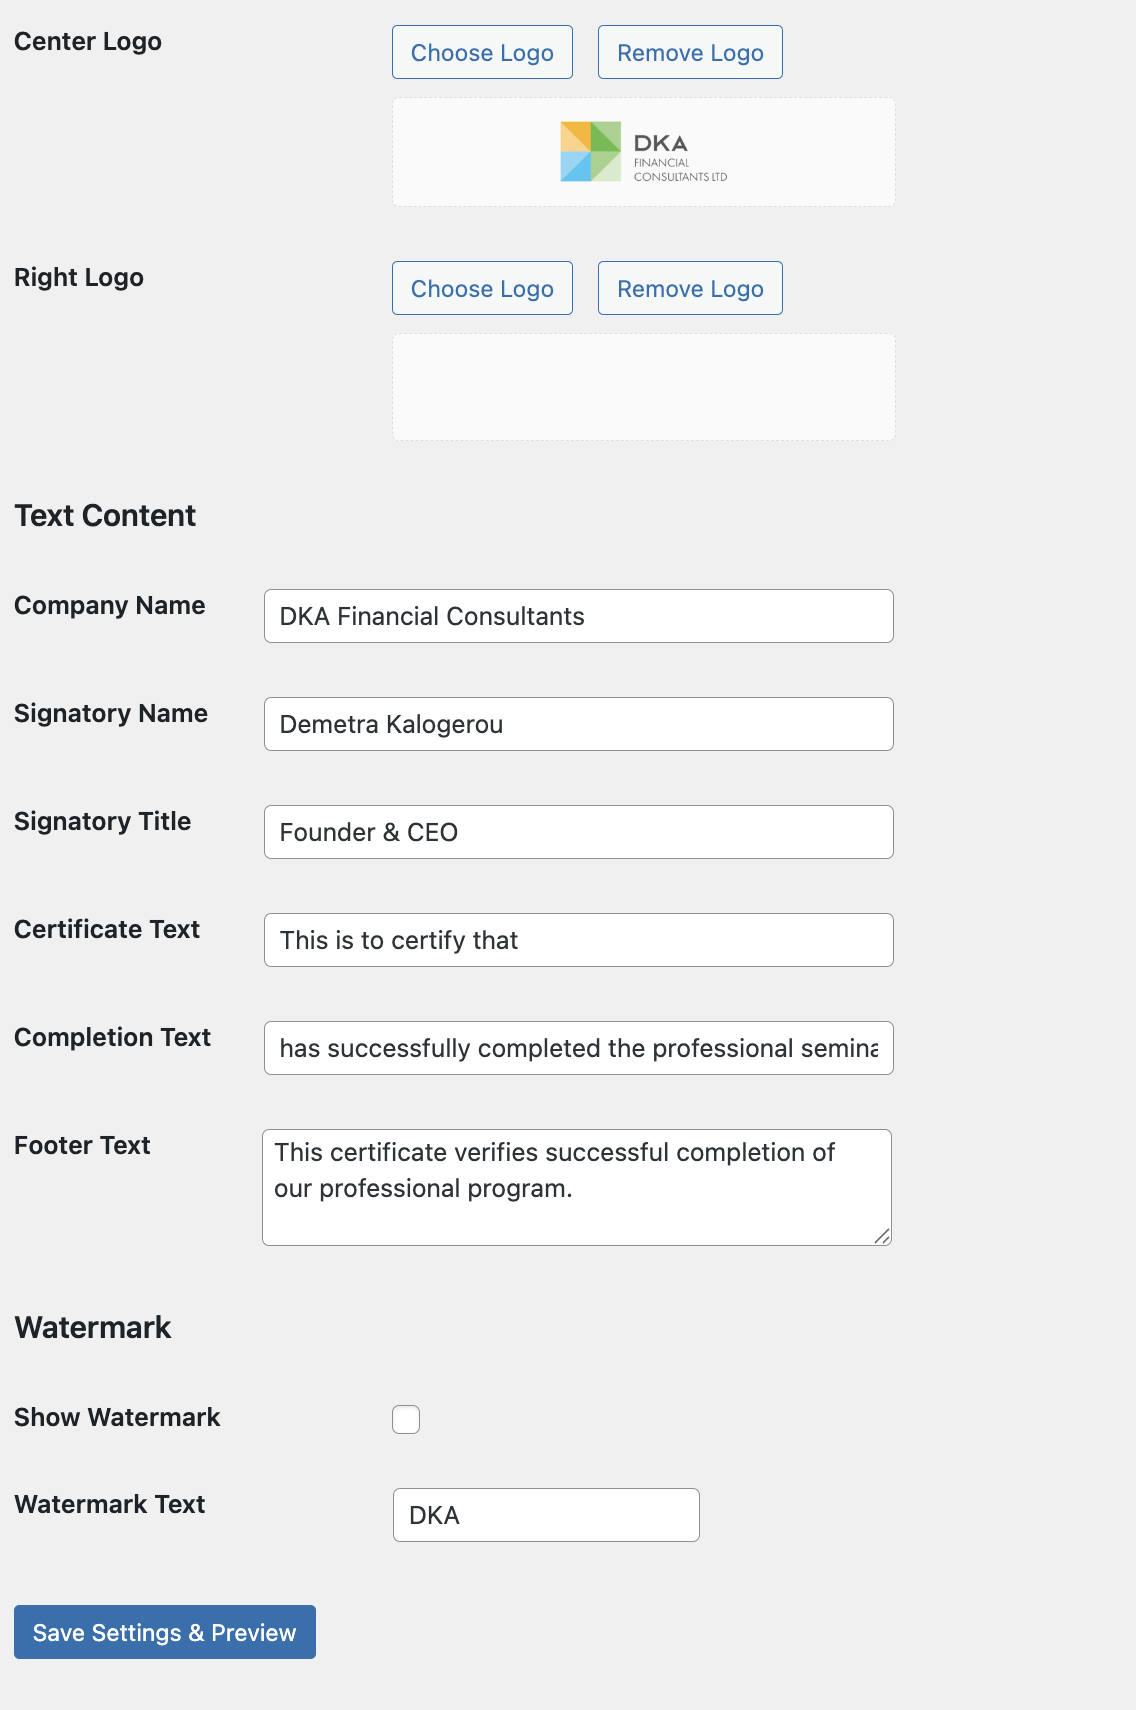
- Add Signature Image:
- Upload scanned signature images
- Position above signature line
- Resize appropriately
- Add Signature Lines:
- Draw or add line elements
- Position below signature images
- Add Name and Title Text:
- Name of signatory
- Title (e.g., "Program Director", "CEO")
- Company name
- Multiple Signatures:
- Add multiple signature sections if needed
- Typical layout: 2-3 signatures across bottom
Example Layout:
[Signature Image 1]        [Signature Image 2]
_________________          _________________
Jane Smith                 John Doe
Program Director           CEO
DKA Consult               DKA Consult
Step 5: Additional Information Fields
- Certificate ID number:
{certificate_id} - Date issued:
{issue_date} - Validity period:
{valid_until} - QR code for verification (if supported)
- Website URL
- Contact information
Adding Certificate Information
Understanding Variable Fields
Variable fields are placeholders that get replaced with actual data during certificate generation.
Common Variables:
- {recipient_name} or {name}: Student/participant name
- {course_name}: Course or program title
- {completion_date} or {date}: Completion date
- {course_hours}: Duration or credit hours
- {instructor}: Instructor or trainer name
- {certificate_id}: Unique certificate identifier
- {grade} or {score}: Performance metrics
Step 1: Insert Variables
- While editing text, click "Insert Variable" or type manually
- Choose from available variables
- The plugin will replace these with real data during generation
Step 2: Format Variables
- Select variable text
- Apply formatting (font, size, color, style)
- This formatting will apply to all generated certificates
Step 3: Preview with Sample Data
- Click "Preview" button
- Enter sample data to see how variables appear
- Adjust design as needed
Bulk Certificate Creation
The plugin's most powerful feature is generating multiple certificates at once.
Step 1: Prepare Your Data
Create a Spreadsheet: Use Excel, Google Sheets, or CSV format with columns for: - Recipient Name - Course Name - Completion Date - Course Hours - Email Address (for sending) - Any other custom fields
Example Spreadsheet: | Name | Course | Date | Hours | Email | |------|--------|------|-------|-------| | John Smith | Business Leadership | 11/15/2025 | 40 | [email protected] | | Jane Doe | Digital Marketing | 11/15/2025 | 32 | [email protected] | | Mike Johnson | Financial Planning | 11/20/2025 | 24 | [email protected] |
Important: - Column headers must match variable names - Use consistent date formatting - Check for spelling errors - Remove empty rows
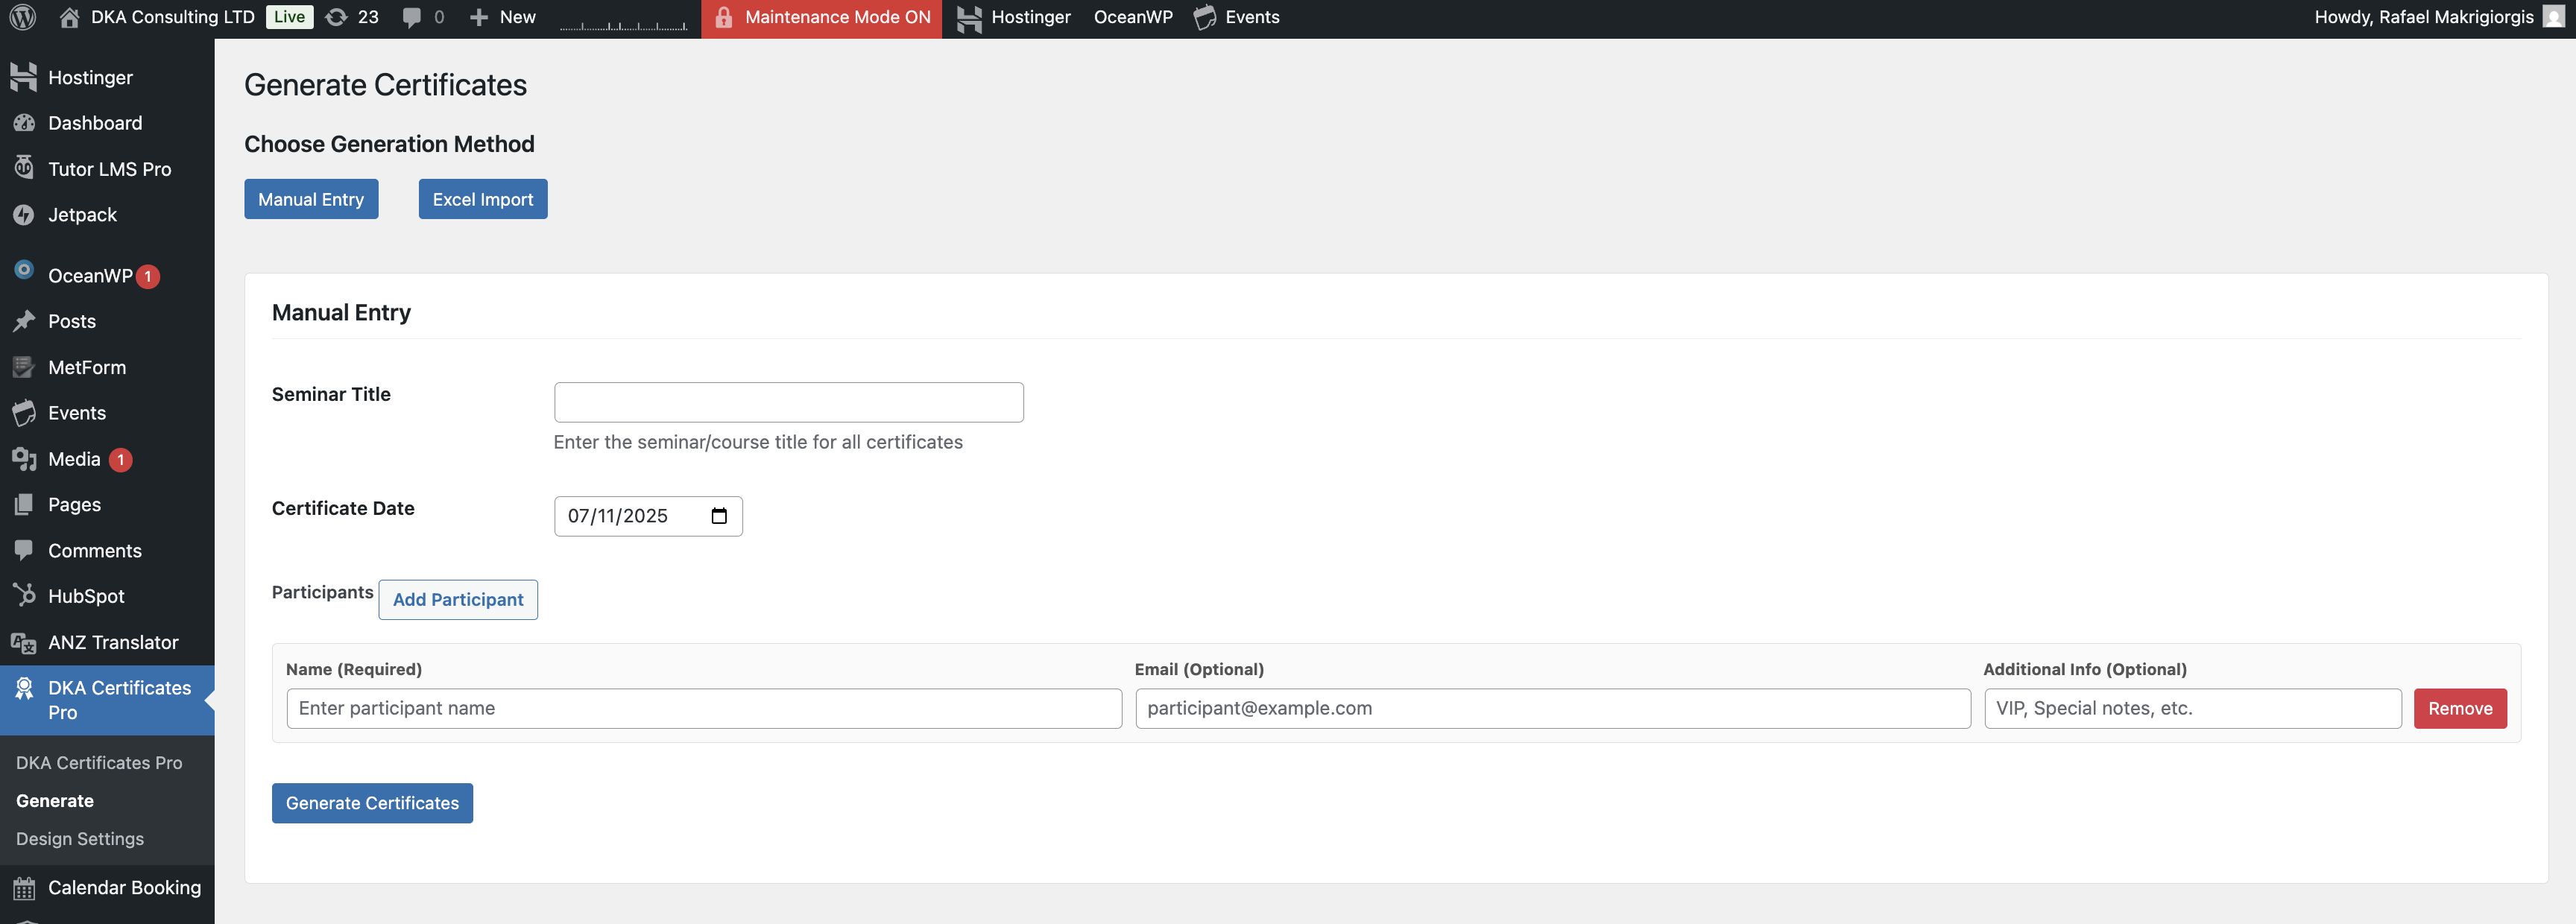
Step 2: Import Data
- In the plugin, click "Bulk Generate" or "Import Recipients"
- Click "Upload File" or "Choose File"
- Select your spreadsheet (CSV, XLSX, or XLS)
- Click "Upload"
Step 3: Map Fields
- The plugin will show your spreadsheet columns
- Map each column to corresponding variables:
- Spreadsheet "Name" → Variable
{recipient_name} - Spreadsheet "Course" → Variable
{course_name} - Spreadsheet "Date" → Variable
{completion_date} - etc.
- Verify mapping is correct
- Click "Continue" or "Next"
Step 4: Select Template
- Choose which certificate template to use
- Preview how data will appear
- Confirm template selection
Managing Recipient Data
Step 1: Review Imported Data
- After import, review the data table
- Check for:
- Missing information
- Incorrect formatting
- Duplicate entries
Step 2: Edit Individual Entries
- Click on any row to edit
- Correct errors or update information
- Save changes
Step 3: Add Manual Entries
- Click "Add Recipient" or "Add Entry"
- Fill in the form with recipient information
- Submit to add to the list
Step 4: Delete Entries
- Select unwanted entries (checkbox)
- Click "Delete Selected"
- Confirm deletion
Step 5: Search and Filter
- Search: Find specific recipients by name
- Filter: View by course, date range, or status
- Sort: Arrange by any column (name, date, etc.)
Generating Certificates
Step 1: Preview Before Generation
- Select a few entries
- Click "Preview" to see how they'll look
- Check for formatting issues
- Verify all data appears correctly
Step 2: Generate Certificates
- Select Recipients:
- Select specific entries (checkboxes)
- Or click "Select All" for all entries
- Choose Generation Options:
- Format: PDF (recommended), PNG, or JPG
- Quality: High resolution for printing (300 DPI)
- File Naming: Use pattern like
{name}-{course}-certificate.pdf - Click "Generate Certificates" button
Step 3: Monitor Progress
- A progress bar shows generation status
- Processing time depends on quantity
- Typically: 1-5 seconds per certificate
- Don't close the browser during generation
Step 4: Generation Complete
- Once finished, you'll see a success message
- Number of certificates generated is displayed
- Options to download or view certificates appear
Downloading and Distributing Certificates
Step 1: Download Options
Individual Downloads: 1. View the list of generated certificates 2. Click "Download" next to each certificate 3. Certificate downloads to your computer
Bulk Download: 1. Select multiple certificates 2. Click "Download Selected" or "Download All" 3. Certificates are packaged in a ZIP file 4. Extract the ZIP file to access individual PDFs
Step 2: Email Distribution
If the plugin supports email distribution: 1. Select recipients with email addresses 2. Click "Send via Email" 3. Customize email message: - Subject line - Email body - Sender name 4. Certificates are automatically attached 5. Click "Send" to distribute
Email Template Example:
Subject: Your Certificate from DKA Consult

Dear {recipient_name},

Congratulations on completing {course_name}!

Please find your certificate of completion attached to this email.

If you have any questions, please don't hesitate to contact us.

Best regards,
DKA Consult Team
Step 3: Print Certificates
- Open downloaded PDF certificates
- Use a high-quality printer
- Recommended Paper:
- Certificate paper or cardstock
- 24-32 lb weight
- White or ivory color
- Professional finish
- Print settings:
- Color mode: Color (not grayscale)
- Quality: Best or High
- Fit to page: On
- Margins: None or minimal
Step 4: Digital Distribution
- Upload to learning management system (LMS)
- Add to student portals
- Share via cloud storage links
- Post to secure website area
Best Practices
Design Best Practices
Professional Appearance: - ✅ Use high-quality images and logos (300 DPI minimum) - ✅ Maintain consistent branding (colors, fonts, logos) - ✅ Keep design clean and uncluttered - ✅ Use professional fonts (avoid overly decorative fonts) - ✅ Ensure good contrast between text and background
Layout Guidelines: - ✅ Center main elements for balance - ✅ Leave adequate white space - ✅ Use hierarchy (larger text for important elements) - ✅ Align elements properly (use alignment tools) - ✅ Test print quality before bulk generation
Content Standards: - ✅ Use proper grammar and spelling - ✅ Include all essential information (name, course, date) - ✅ Add unique certificate ID for verification - ✅ Include company logo and branding - ✅ Add authorized signatures
Data Management Best Practices
Before Generation: - ✅ Double-check all recipient names (spelling, capitalization) - ✅ Verify dates are formatted consistently - ✅ Ensure course names are accurate - ✅ Remove test or duplicate entries - ✅ Back up your recipient data spreadsheet
During Generation: - ✅ Start with a small test batch (5-10 certificates) - ✅ Review test certificates carefully - ✅ Verify all variables are populated correctly - ✅ Check for truncated text or formatting issues - ✅ Only proceed with full batch after successful test
After Generation: - ✅ Keep records of all generated certificates - ✅ Store certificates in organized folders - ✅ Maintain a database of issued certificates - ✅ Back up certificate files regularly - ✅ Track who received which certificates
Distribution Best Practices
Email Distribution: - ✅ Test email sending with a few recipients first - ✅ Personalize email messages - ✅ Include instructions for printing - ✅ Provide contact information for issues - ✅ Follow up on delivery failures
Physical Distribution: - ✅ Use quality paper for printed certificates - ✅ Consider protective folders or frames - ✅ Hand deliver or use secure shipping - ✅ Get signatures for received certificates - ✅ Keep distribution records
Template Management
Organization: - ✅ Name templates clearly (e.g., "Leadership-Course-2025") - ✅ Save different versions for different courses - ✅ Document template specifications - ✅ Keep master copies of all templates - ✅ Regularly review and update templates
Version Control: - ✅ Date template versions - ✅ Note changes in template descriptions - ✅ Archive old templates (don't delete) - ✅ Test new templates before using in production - ✅ Maintain consistency across template updates
Troubleshooting Common Issues
Issue: Certificate text is cut off or truncated
Solutions: - Reduce font size - Shorten text content - Increase certificate dimensions - Adjust text box size in template - Check margins and padding
Issue: Images appear blurry or pixelated
Solutions: - Use higher resolution images (300 DPI minimum) - Upload images in proper format (PNG for logos) - Don't over-enlarge small images - Check image quality before uploading
Issue: Variables not being replaced with data
Solutions: - Verify variable names match exactly - Check data mapping during import - Ensure no extra spaces in variable names - Review spreadsheet column headers - Test with sample data first
Issue: Bulk generation fails or stops
Solutions: - Reduce batch size (generate in smaller groups) - Check for corrupt data entries - Ensure stable internet connection - Clear browser cache - Try different browser - Check file size limits
Issue: Certificates won't download
Solutions: - Check browser download settings - Disable pop-up blockers - Clear browser cache - Try different browser - Check available disk space - Verify file permissions
Issue: Email distribution not working
Solutions: - Verify email addresses are correct - Check email server settings - Look for bounce-back messages - Test with a single email first - Check spam folders - Verify SMTP configuration
Advanced Features
Custom Fields
- Add custom fields beyond standard ones
- Create unique variables for specific needs
- Example:
{accreditation_number},{instructor_signature}
QR Codes
- Generate unique QR codes for verification
- Link to online certificate verification page
- Helps prevent fraud and counterfeiting
Batch Processing
- Schedule automatic generation
- Set up recurring certificate generation
- Process large volumes efficiently
Templates Library
- Create multiple templates for different courses
- Share templates across team members
- Import templates from external sources
Analytics and Reporting
- Track how many certificates generated
- View distribution statistics
- Export reports for record-keeping
Security and Compliance
Data Protection
- ✅ Keep recipient data secure
- ✅ Comply with privacy regulations (GDPR, CCPA)
- ✅ Limit access to authorized personnel only
- ✅ Use secure connections (HTTPS)
- ✅ Regularly update plugin for security patches
Certificate Authenticity
- ✅ Use unique certificate IDs
- ✅ Implement verification system
- ✅ Keep generation logs
- ✅ Use digital signatures if available
- ✅ Store issued certificates securely
Record Keeping
- ✅ Maintain records of all issued certificates
- ✅ Document who generated certificates
- ✅ Keep audit trail of changes
- ✅ Back up data regularly
- ✅ Retain records per legal requirements
Support and Updates
Getting Help
If you encounter issues: 1. Review this tutorial 2. Check plugin documentation 3. Contact plugin developer support 4. Reach out to DKA Consult IT administrator 5. Check for plugin updates
Plugin Updates
- Regularly check for updates in WordPress
- Review update notes for new features
- Back up templates and data before updating
- Test functionality after updates
Conclusion
The Create Certificates Plugin is a powerful and efficient tool for generating professional certificates in bulk. Whether you're creating certificates for dozens or hundreds of course completions, this plugin streamlines the process while maintaining design quality and customization.
Key Takeaways: - Design custom, professional certificate templates - Import recipient data from spreadsheets for bulk processing - Fully customize every element (fonts, colors, images, layout) - Generate certificates efficiently in batches - Download individually or in bulk ZIP files - Distribute via email or print for physical delivery - Maintain organized records of all issued certificates
By following this tutorial, you can efficiently manage DKA Consult's certificate generation needs, ensuring each course graduate receives a professional, personalized certificate of completion.
Happy Certificate Creating! 🎓📜